Getting Started
Welcome to SportsOrganised. This guide walks you through everything you need to run your first carnival — from logging in for the first time to entering results on the day.
-
1
Log in with your school email and password
Go to sportsorganised.com.au and click Log in. Use the email and password set up by your SportsOrganised account manager, or sign in with Microsoft if your school uses Microsoft 365.
-
2
Explore your dashboard
Your dashboard shows any active carnival at the top, with quick links to nominations, results, and the schedule. The blue sidebar on the left gives you access to all areas of the platform.
-
3
Follow the setup order
For a new school account, work through the steps in this guide in order: set up your school profile and houses first, then import students, then create your carnival and events. Nominations and results come last.
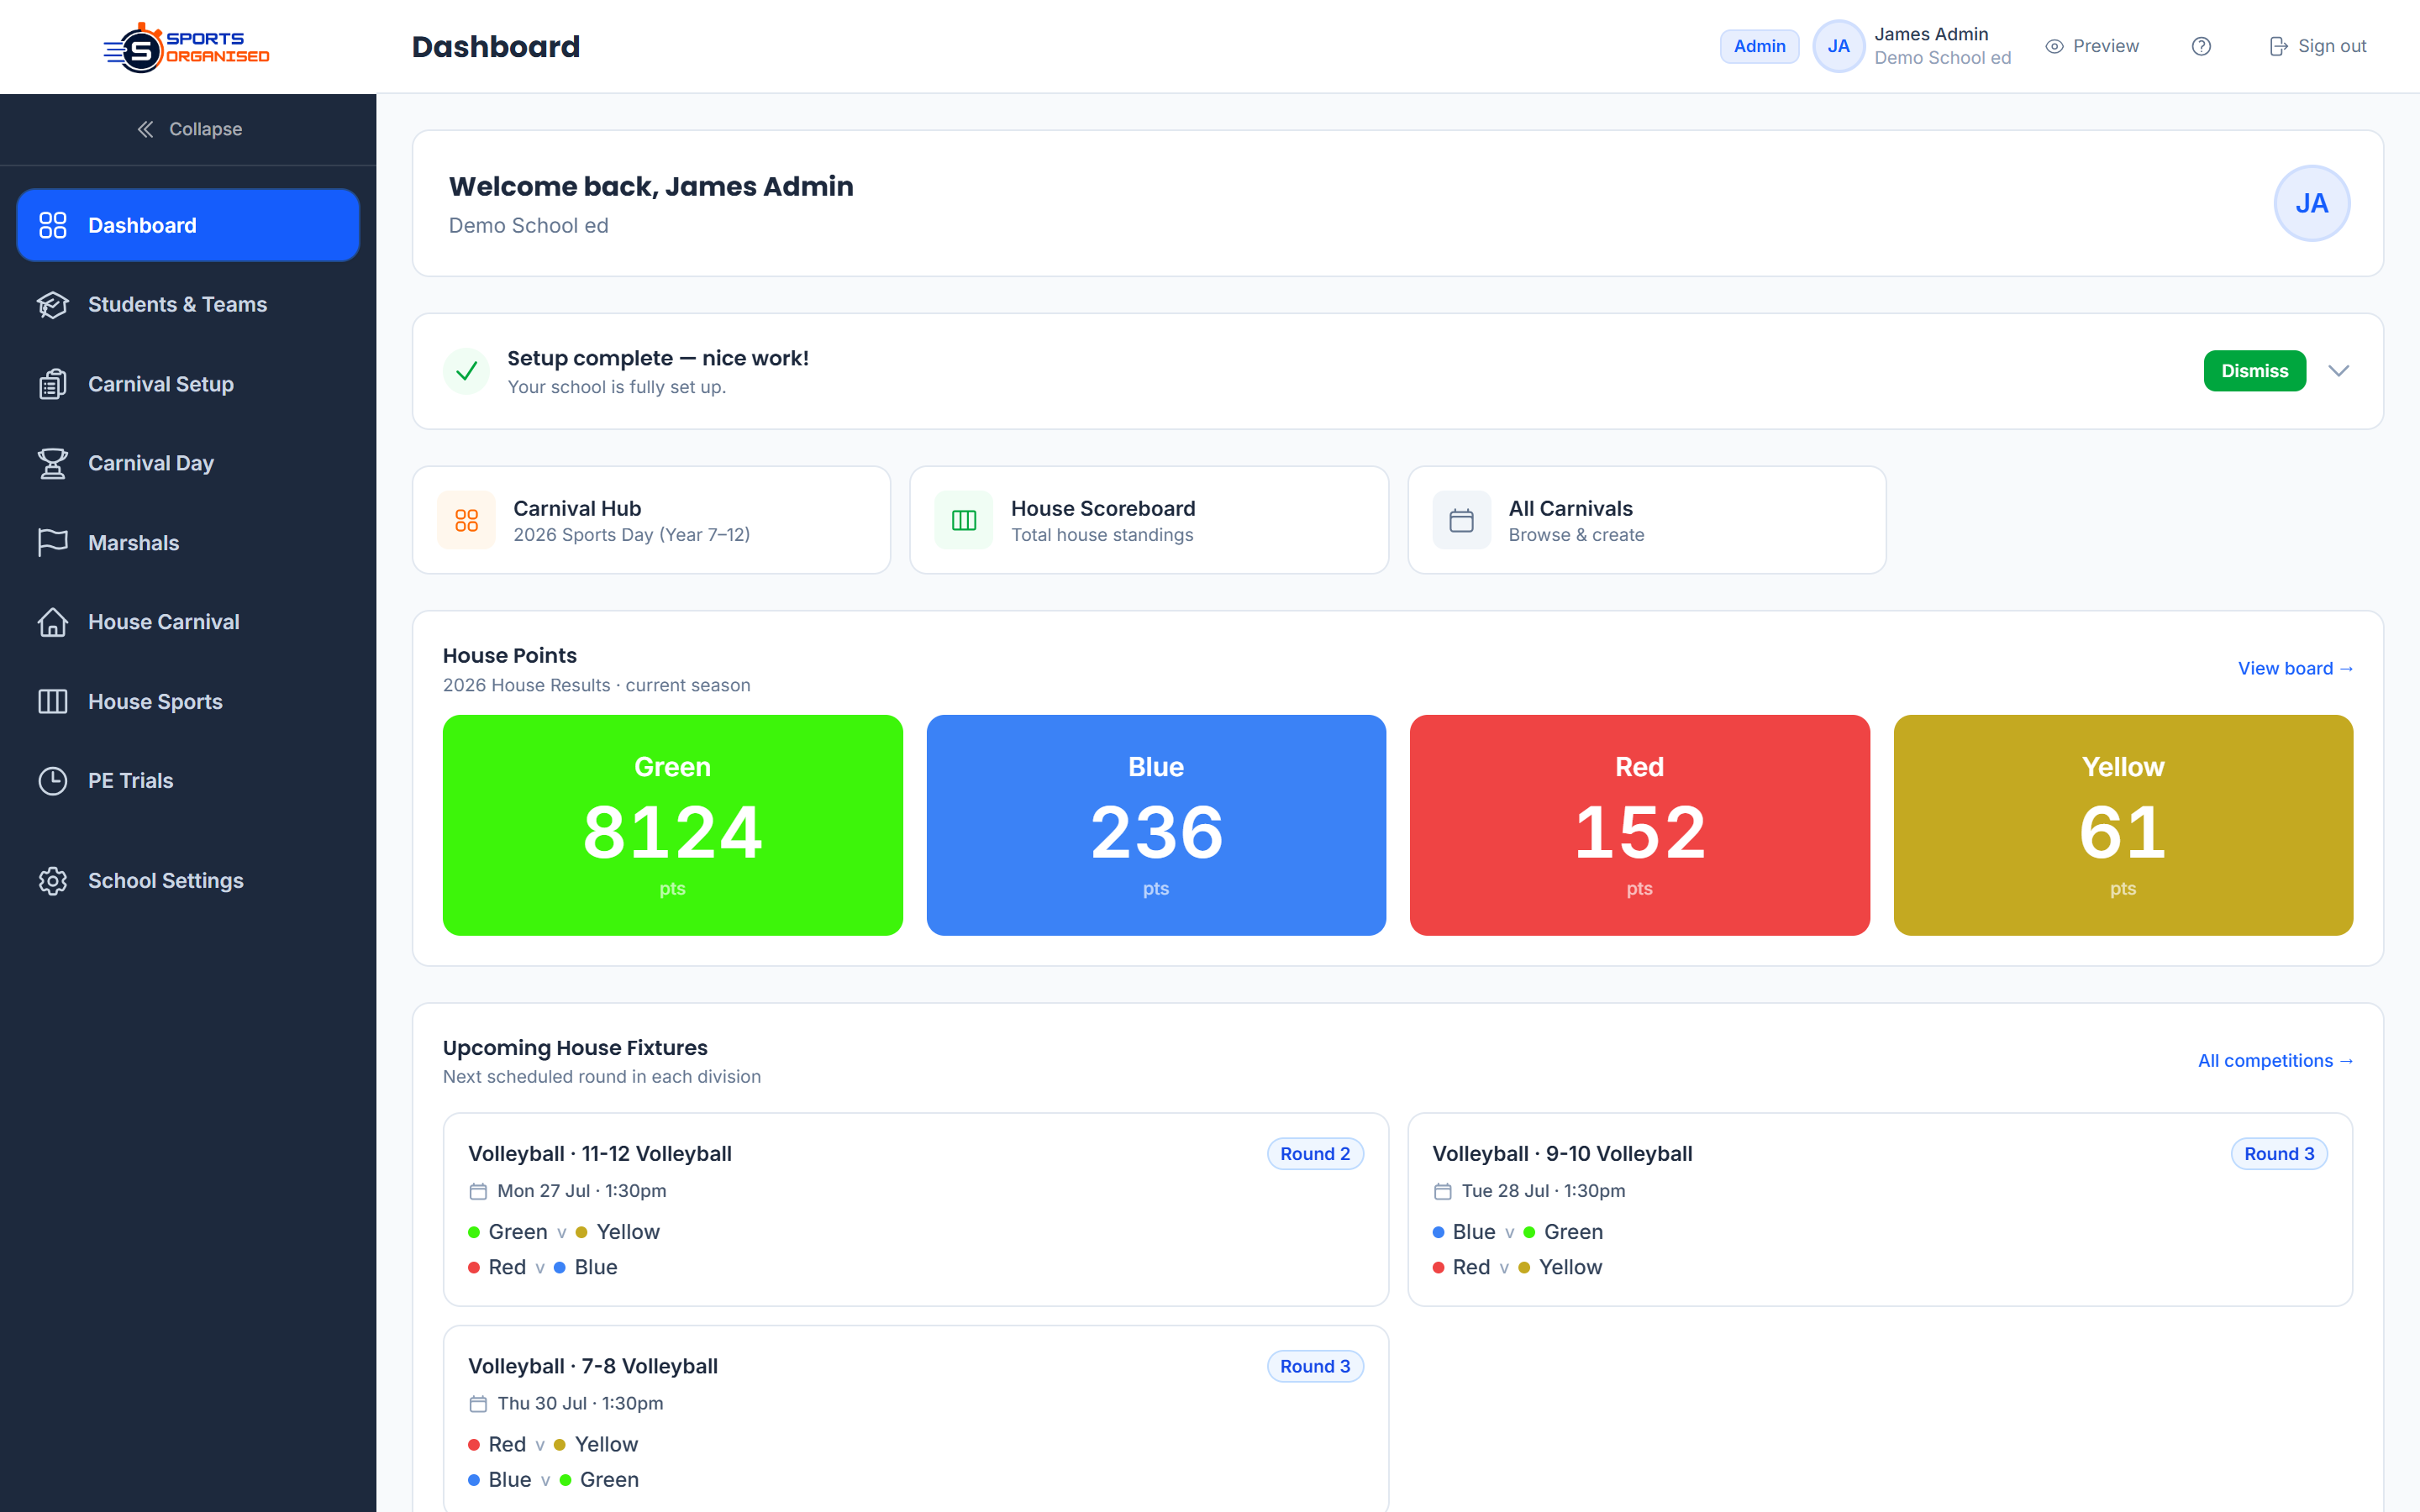
Screenshot: Dashboard overview
Image will appear here once captured
School Setup
Configure your school's profile, houses, and staff before you create your first carnival. This only needs to be done once and carries over to all future carnivals.
-
1
Set your school profile
In the sidebar, go to School → Profile. Enter your school name, contact email, and address. This information appears on printed score sheets and reports.
-
2
Add your houses
Go to School → Houses and click New House. Enter the house name, a short abbreviation (e.g. PHX), and pick its colour from the colour picker. Repeat for all houses. House colours appear throughout the platform to identify teams at a glance.
-
3
Invite staff members
Go to School → Users and click New User. Enter the staff member's name, email, and assign their role. Roles control what each person can see and do — admins have full access, marshals and recorders have carnival-day access only, and team managers can only nominate students for their own house.
-
4
Assign houses to team managers
When adding a team manager user, select which house they are responsible for. They will only see nomination slots for that house and cannot view other houses' selections.
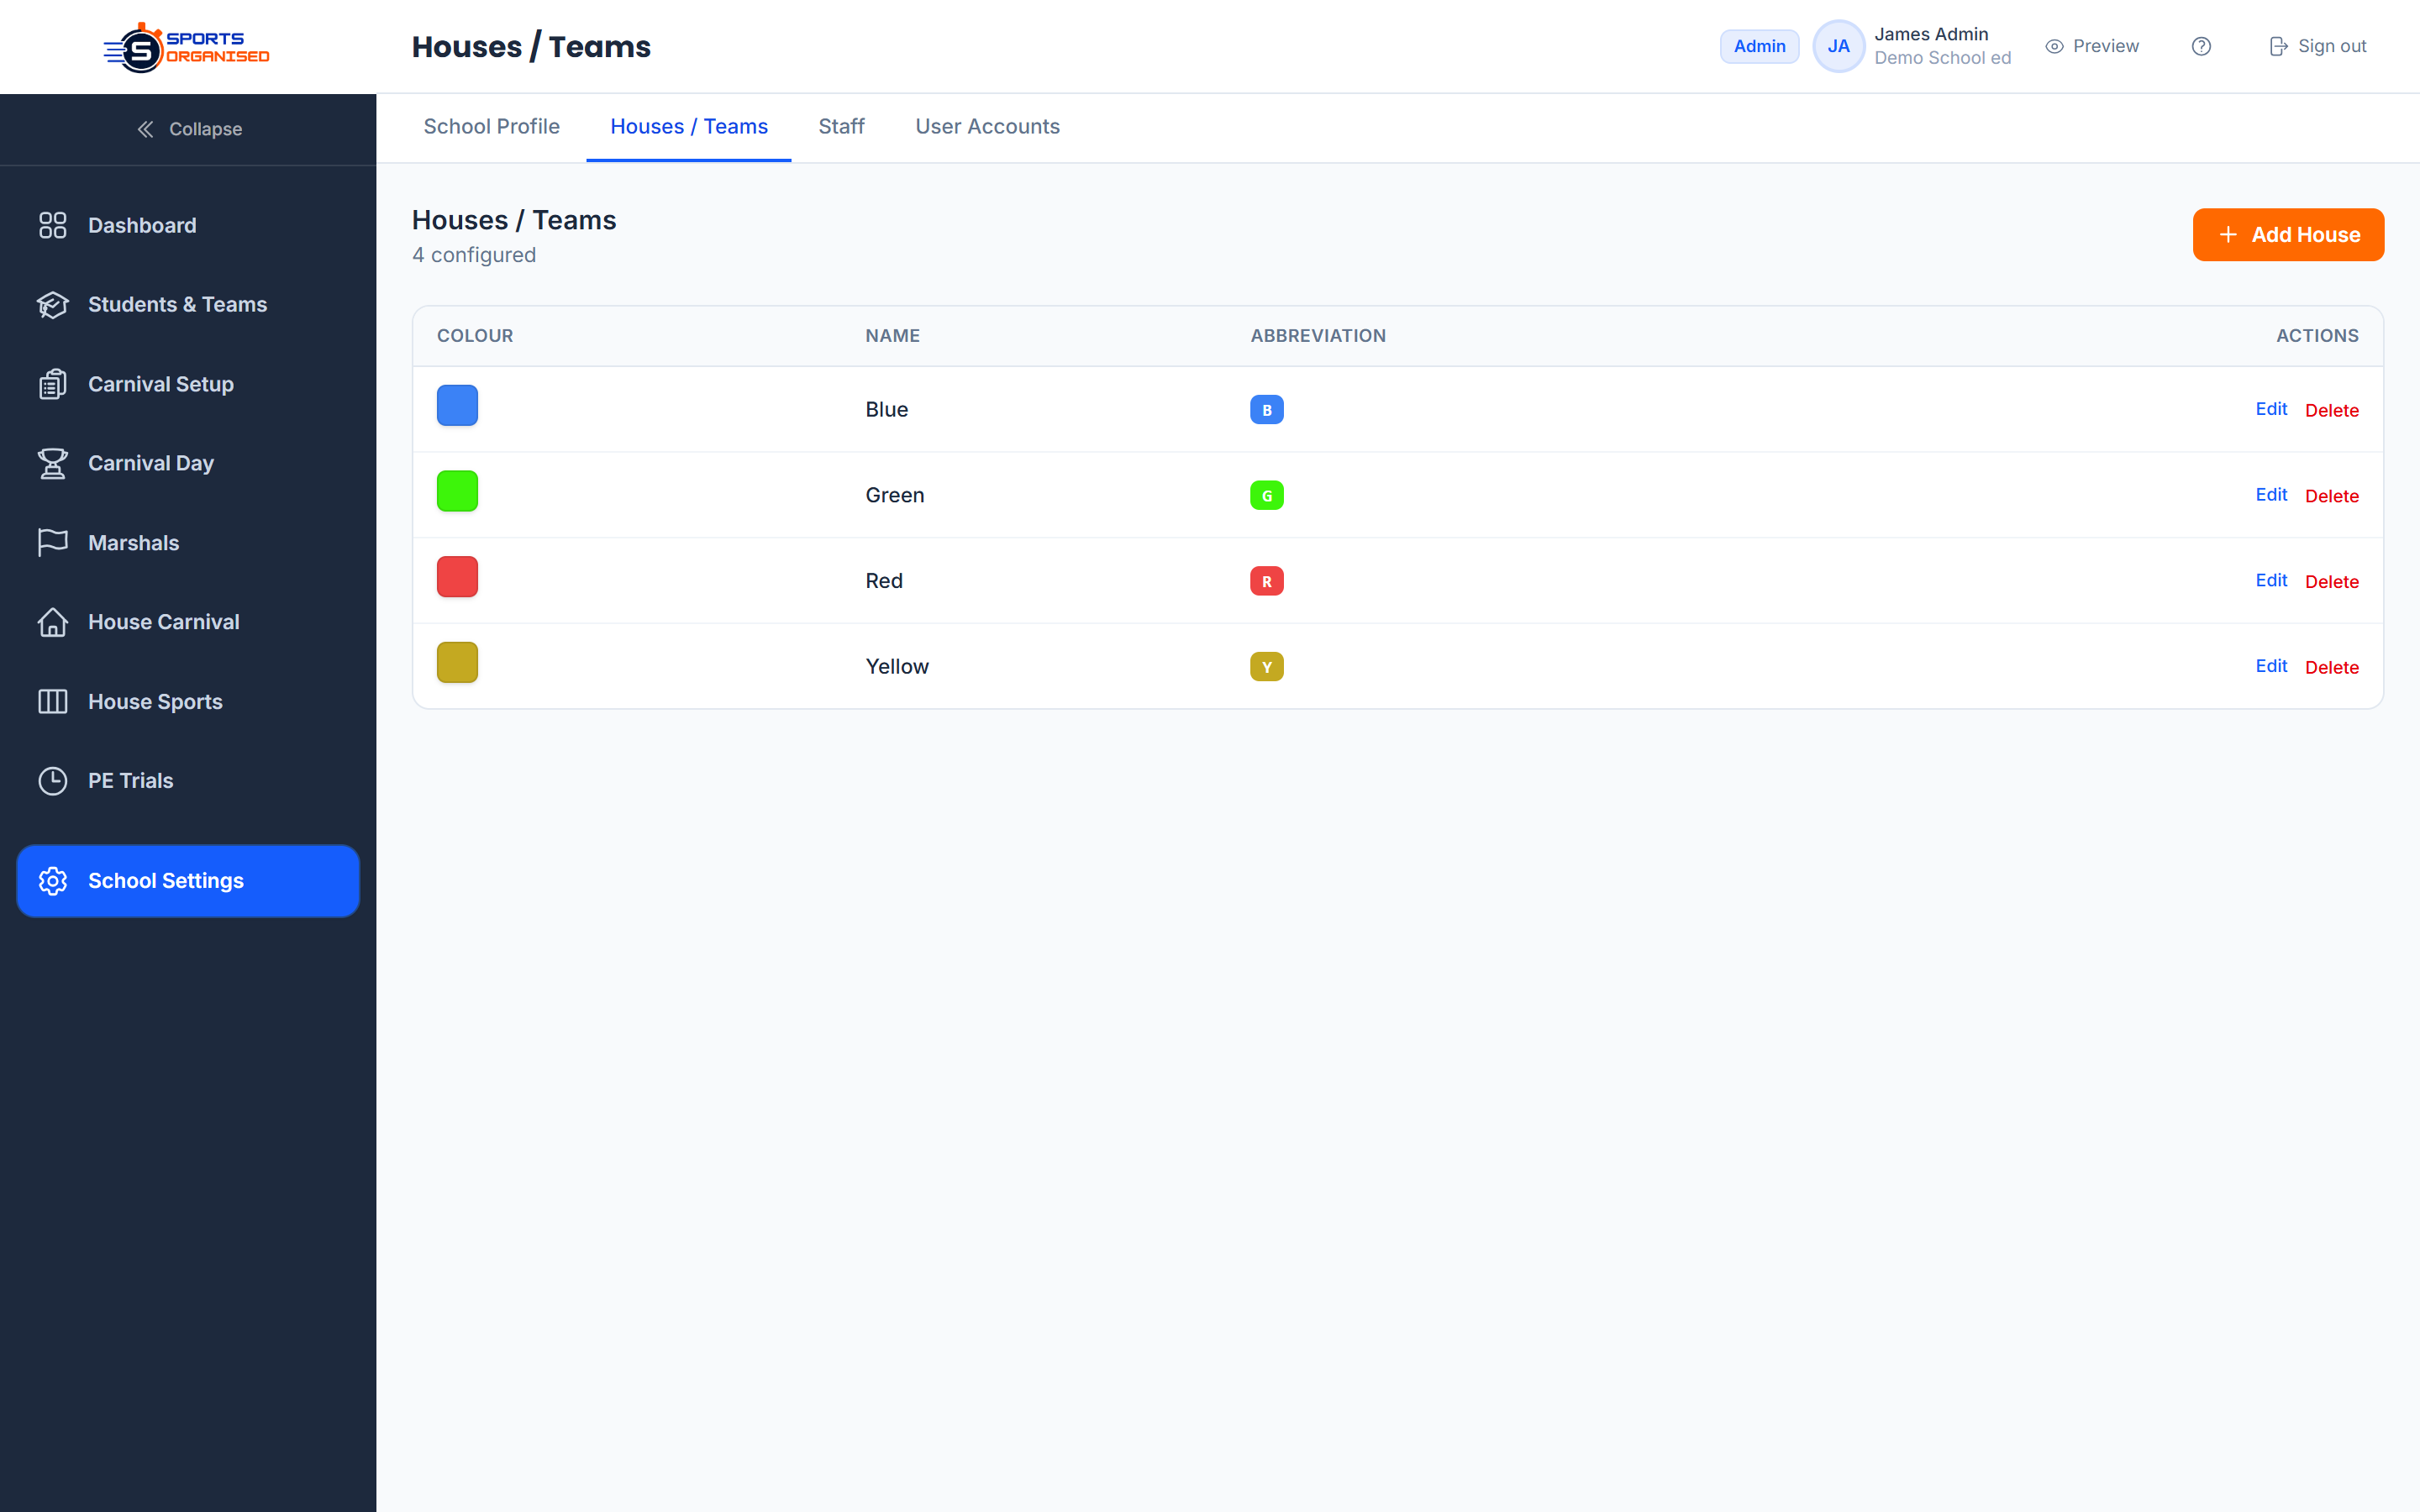
Screenshot: Houses & Users setup
Image will appear here once captured
Managing Students
Students must be in the system before they can be nominated for events. You can add them one at a time or import a large list via CSV.
-
1
Go to School → Students
The student list shows all students at your school with their house, age group, and auto-generated student code. Use the search and filter tools to find specific students.
-
2
Add a student manually
Click New Student and fill in the required fields — first name, last name, gender, and house. A student code is generated automatically. Date of birth is optional and no contact information is stored.
-
3
Set the age group exactly as your events will use it
Each student has two age-group fields. Age Group 1 is the primary grouping (e.g. an athletics group like 14B or U15). Age Group 2 is an optional second grouping for a different carnival — e.g. swimming, or a year-level grouping like Year 9B. Each carnival picks which of these two columns it reads. The value you enter must match the age group on your events exactly (14B and "Under 14 Boys" are treated as different groups) or the student won't appear when you nominate. The separate Year Level field is for admin only and does not affect eligibility.
-
4
Import students via CSV
For bulk imports, click Import Students. First, download the CSV template to see the required column format. Prepare your file with one student per row, then upload it. The 3-step wizard shows you a preview before any data is saved.
-
5
Confirm the import
Review the preview screen — it highlights any rows with errors so you can fix them before confirming. Click Import to save all valid rows. Students are added instantly and are ready to be nominated for events.
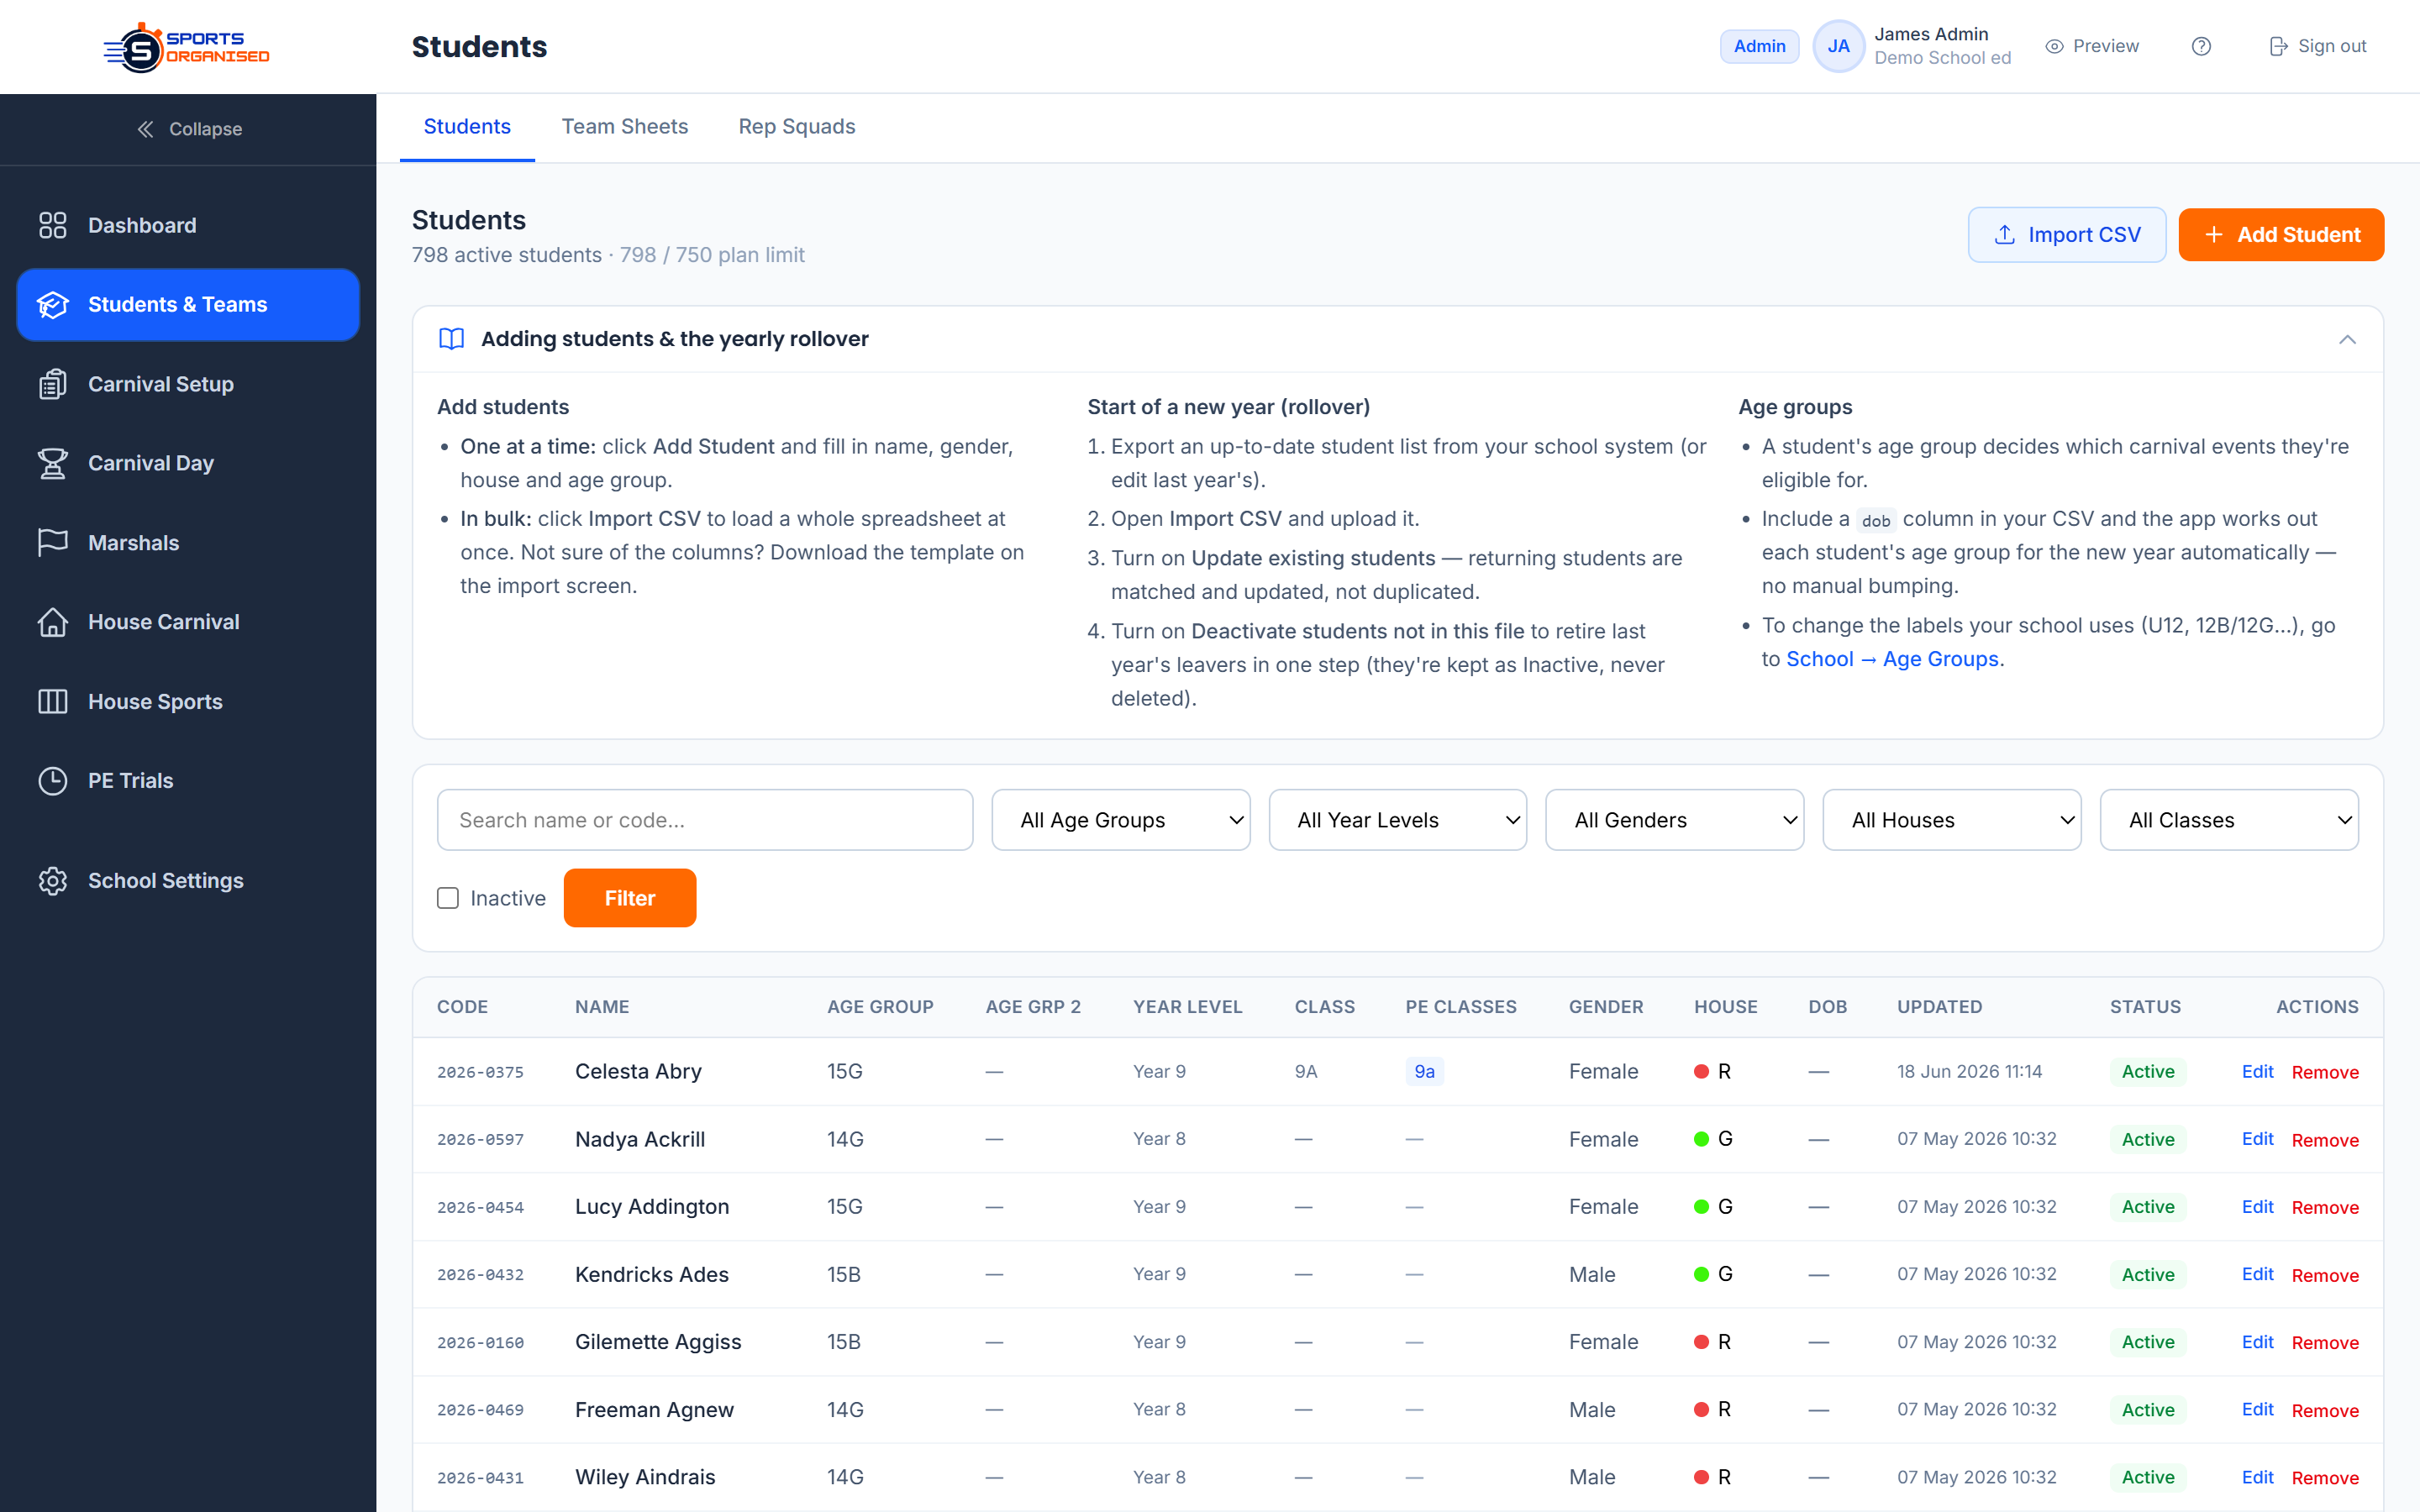
Screenshot: Student list & import wizard
Image will appear here once captured
Creating a Carnival
A carnival is the container for all your events, nominations, and results. You can run multiple carnivals per year — athletics, swimming, and sports days can each be their own carnival.
-
1
Go to Carnivals → New Carnival
From the sidebar, click Carnivals then New Carnival. Enter the carnival name, select the type (Athletics, Swimming, or Sports Day), and set the date and times.
-
2
Choose the eligibility column
Under Age Group Column, choose whether this carnival reads each student's Age Group or Age Group 2 field (the two groupings you set on the student record). Use Age Group for your primary carnival and Age Group 2 for a second one (e.g. swimming). The form shows a sample of the values already on your students so you can confirm you picked the right column. Also set Max Events per Student and Events Counted for Champion here — these caps are enforced automatically during nominations.
-
3
Work through the Carnival Setup hub
After you click Create Carnival, you land on the Carnival Setup page. A progress banner at the top tracks the steps needed before you can open nominations: Age groups, Points & scoring, and Events (Schedule is optional). Click each tile to complete it — the banner turns green and reads "Ready to open nominations" once the three required steps are done.
-
4
Define age groups and the points table
Open the Age Groups tile to add each age group label for this carnival — these must match the values on your students and events. Then open Points & Scoring to set how many points each place earns (load a preset or enter custom values; any place beyond 10th automatically receives 1 point) and to select your champion division.
-
5
Set the carnival to Active
New carnivals start as Draft. Once setup is complete, open Carnival Settings from the hub and change the status to Active. This shows the carnival on the dashboard for marshals and recorders, lets team managers nominate, and makes the public results link visible. (As an admin you can build events and nominations while still in Draft.)
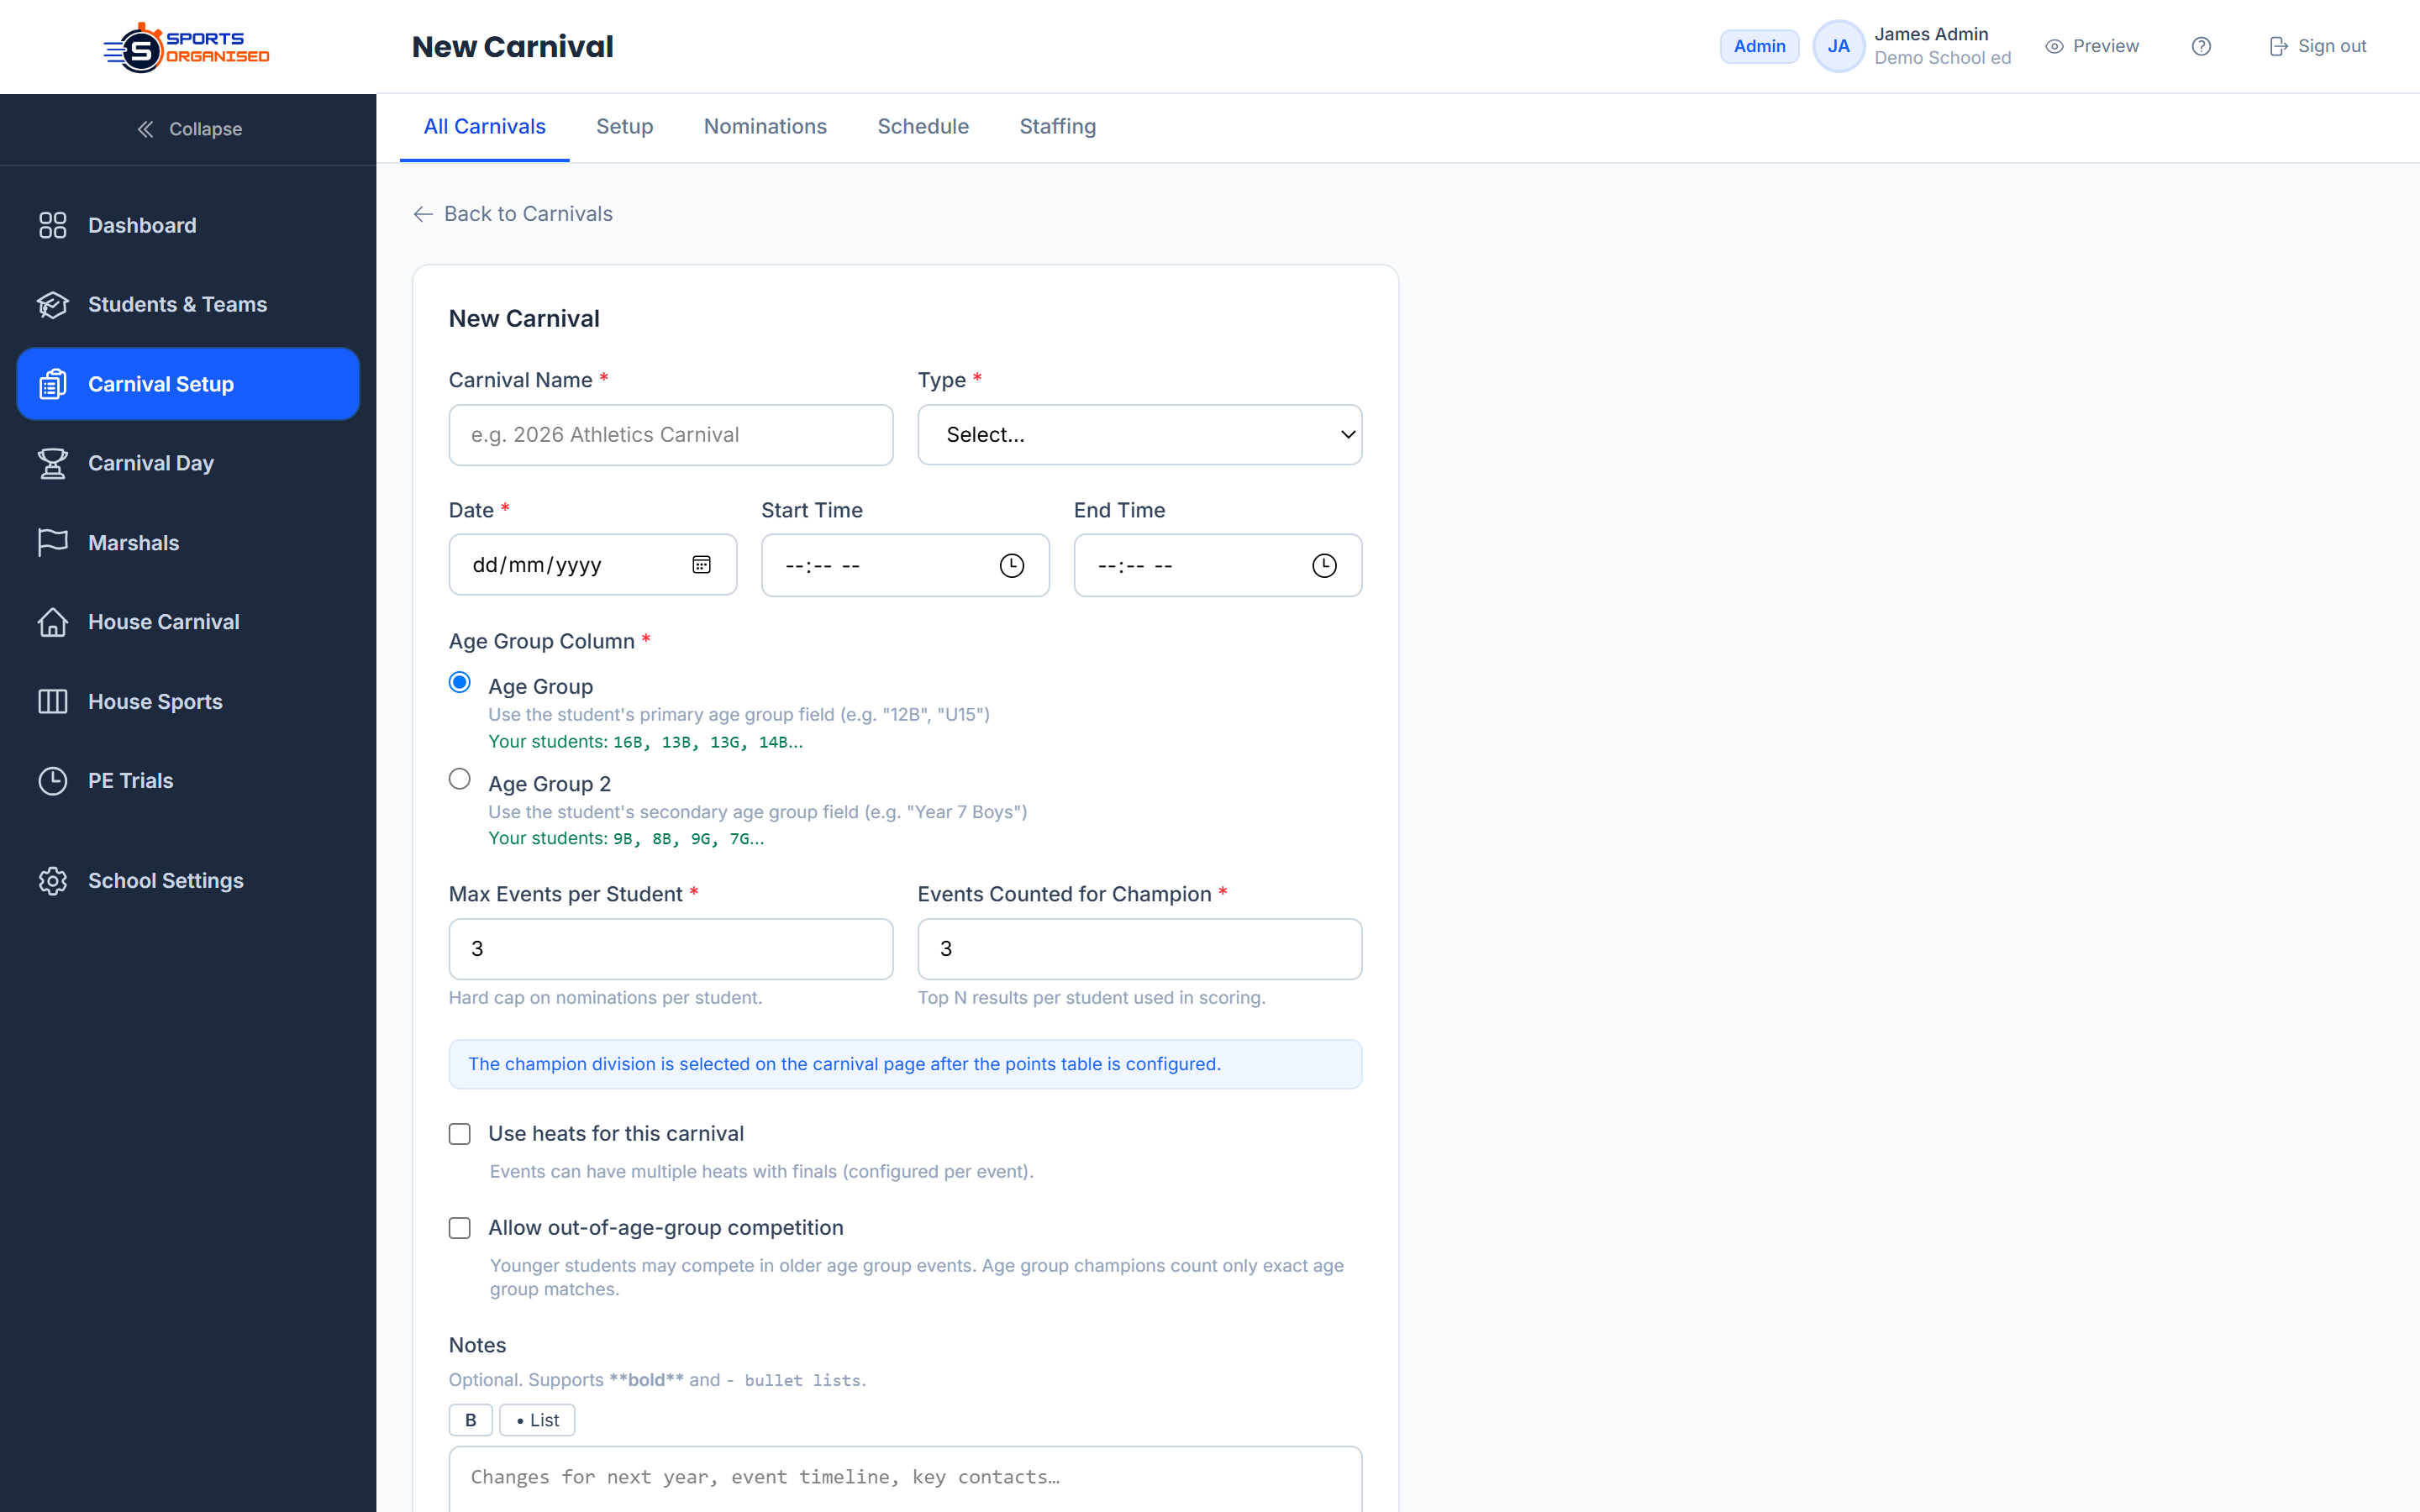
Screenshot: Create carnival form
Image will appear here once captured
Setting Up Events
Events are the individual competitions within your carnival — for example, "100m Boys Under 11" or "Long Jump Girls Under 14". Each event is linked to an age group and gender, which controls which students are eligible to compete.
-
1
Open your carnival and go to Events
From the carnival hub page, click Events in the sidebar or the events panel. Click New Event to add an individual event.
-
2
Fill in the event details
Enter an event number (used for ordering and printing), a name (e.g. 100m Sprint), the type (Track, Field, Swim, or Team), the age group, and the gender (Boys, Girls, or Open).
-
3
Enter the current record (optional)
If your school tracks carnival records, enter the existing record value — in seconds for track and swim events, or metres for field events. Records are shown on printed score sheets and highlighted when broken.
-
4
Import events in bulk via CSV
For carnivals with many events, use Import Events to upload a CSV. Download the template first to see the required columns. The import wizard shows a preview before saving — errors are highlighted row by row so you can correct them in your spreadsheet and re-upload.
-
5
Reorder events for the running sheet
Use Reorder Events to drag events into the order they will run on the day. This order is used for printed programs, score sheets, and the results entry view.
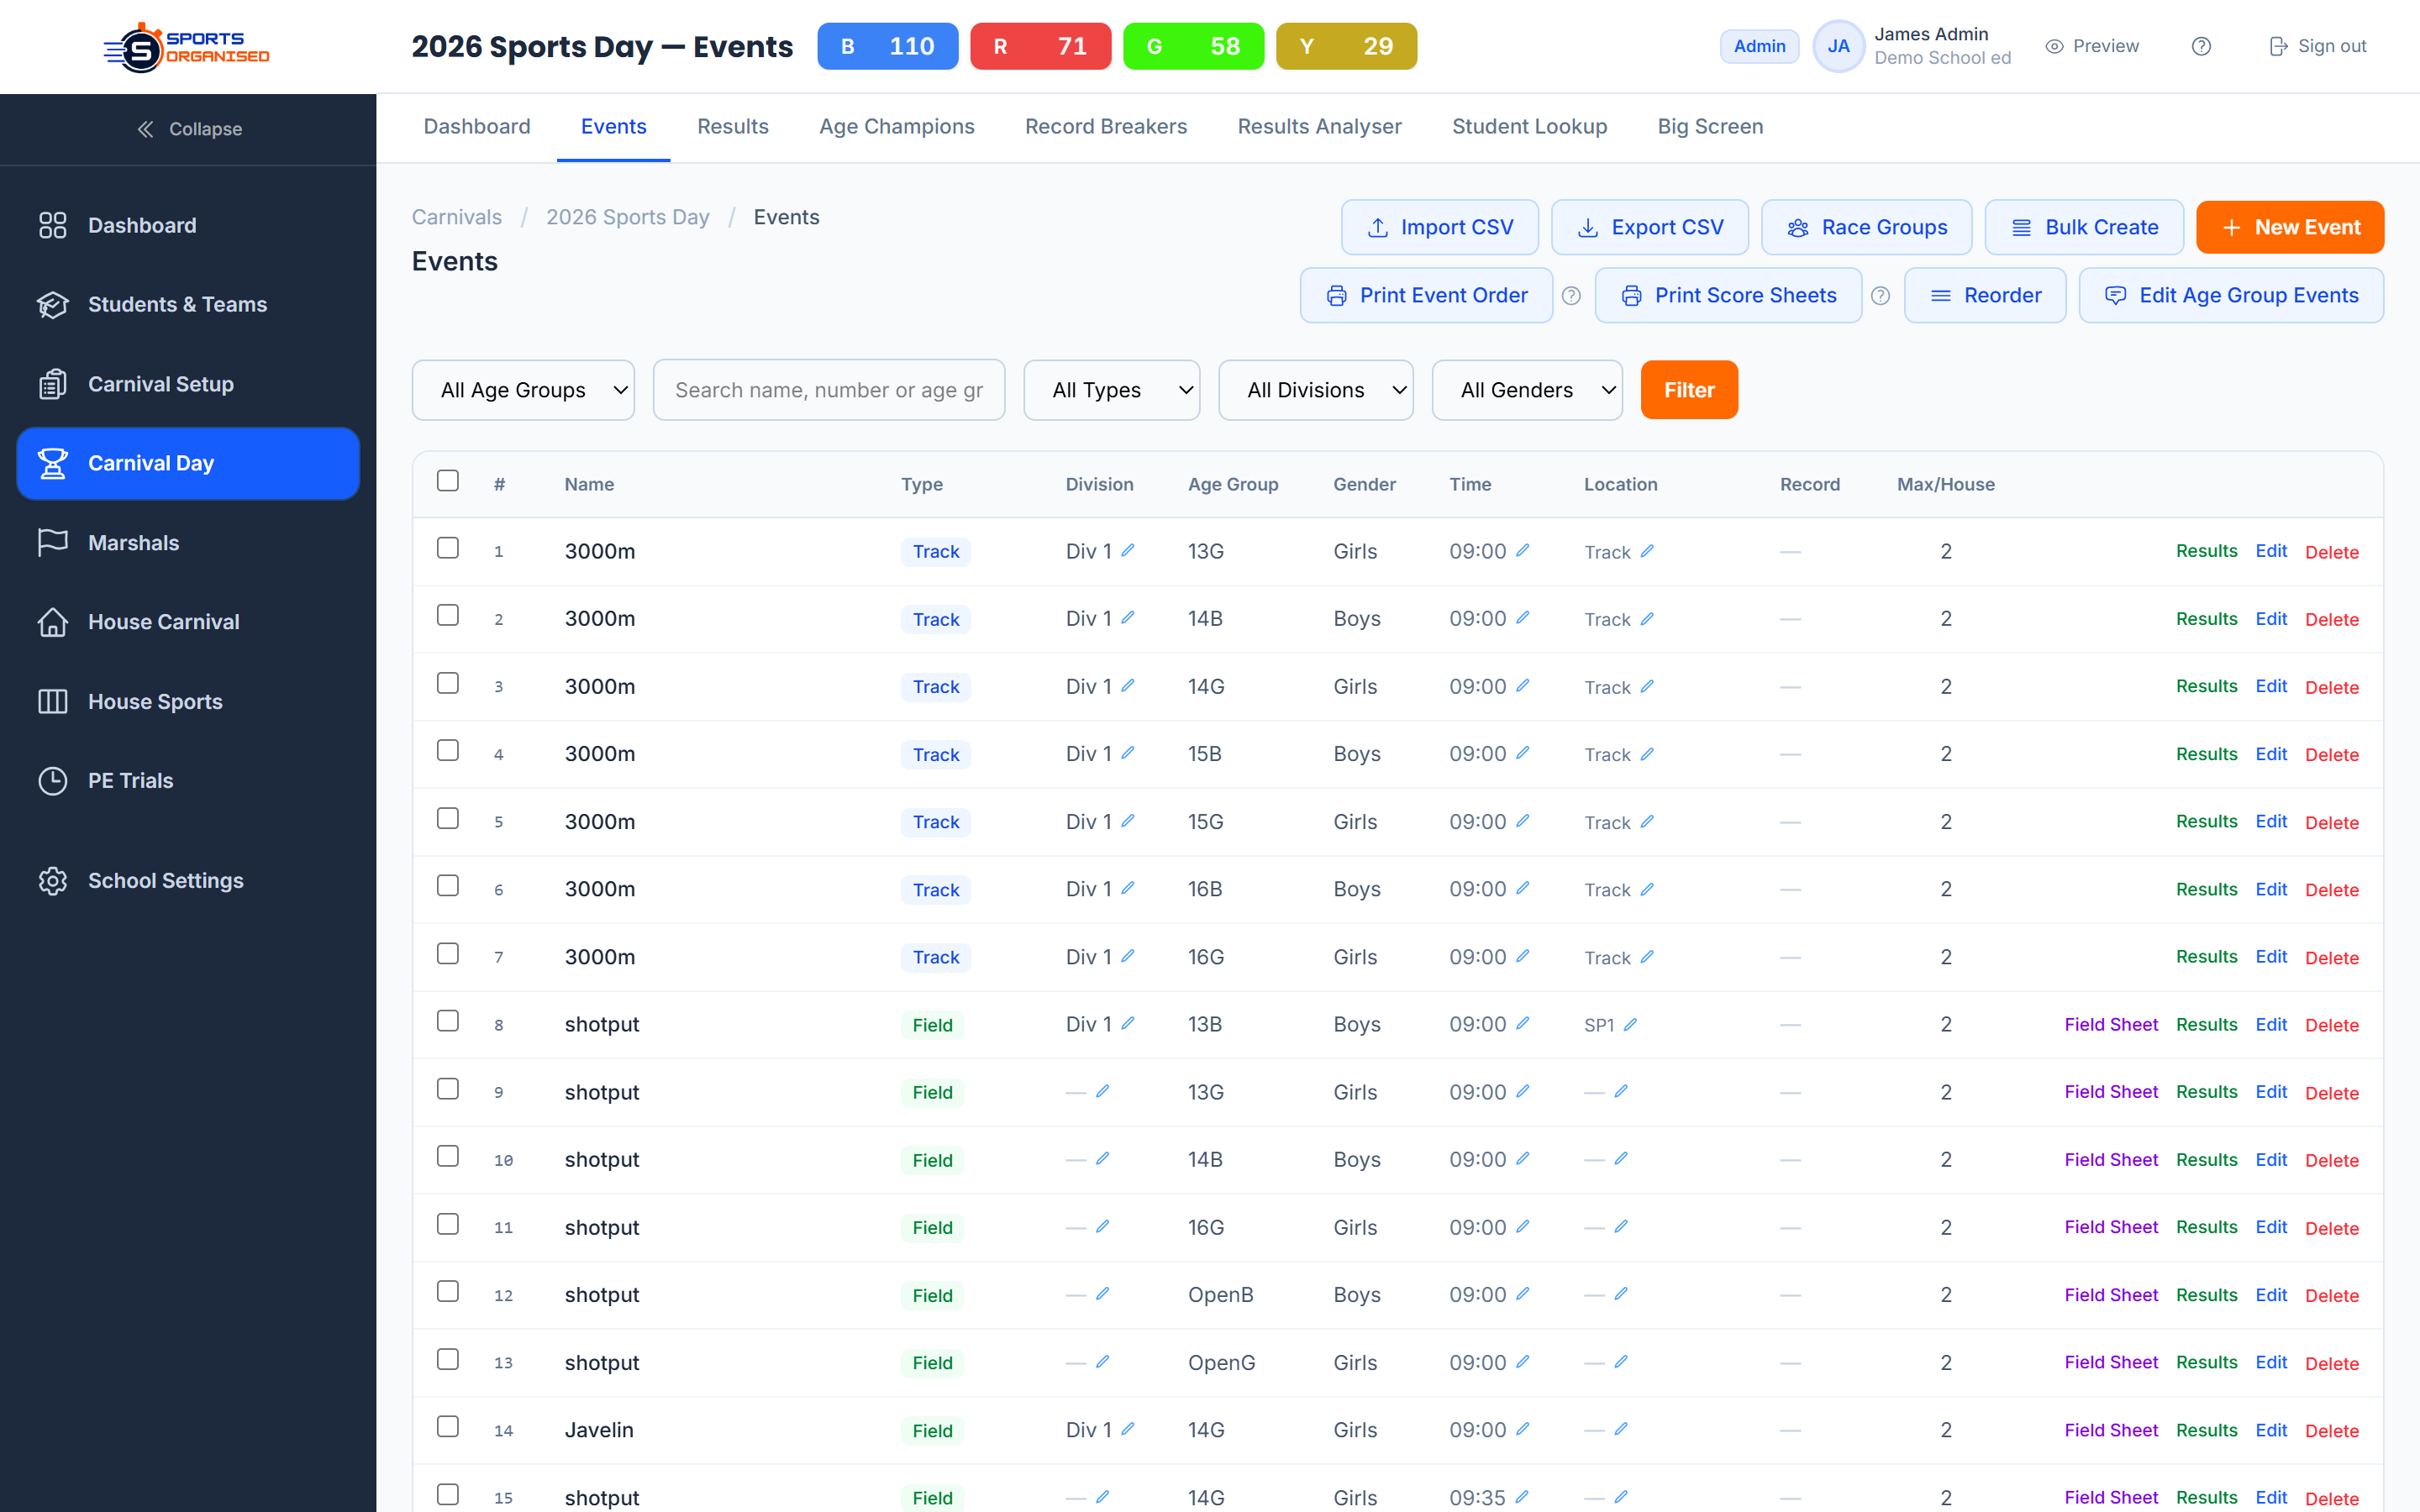
Screenshot: Events list & new event form
Image will appear here once captured
Managing Nominations
Nominations link students to events. Each house nominates their own students per event. The platform enforces eligibility rules and caps automatically, so no student can be over-nominated.
-
1
Generate nomination slots
Open your carnival and click Nominations. If slots haven't been generated yet, click Generate Slots. This creates the nomination spots for every event and house combination. This is a one-time step — it's safe to run again if you add new events later.
-
2
Nominate students per event
The nominations page shows an accordion list of all events. Expand an event to see the nomination slots for each house. Click a slot and select a student from the dropdown — only eligible students for that event's age group and gender appear in the list.
-
3
Understand eligibility rules
For age-based carnivals, eligibility is matched to the student's age group. For year-based carnivals, it's matched to their school year level. Students whose age group or year level doesn't match the event won't appear in the dropdown.
-
4
Event and champion caps are enforced automatically
The platform limits how many students per house can enter each event (max per house), and how many events each student can be nominated in for champion consideration (champion cap). A warning appears when a student is approaching their cap — and the system prevents over-nomination.
-
5
Team managers can nominate their own house
If you've added team manager users for each house, they can log in and nominate students for their own house independently. Their view is automatically filtered — they can't see or edit other houses' nominations.
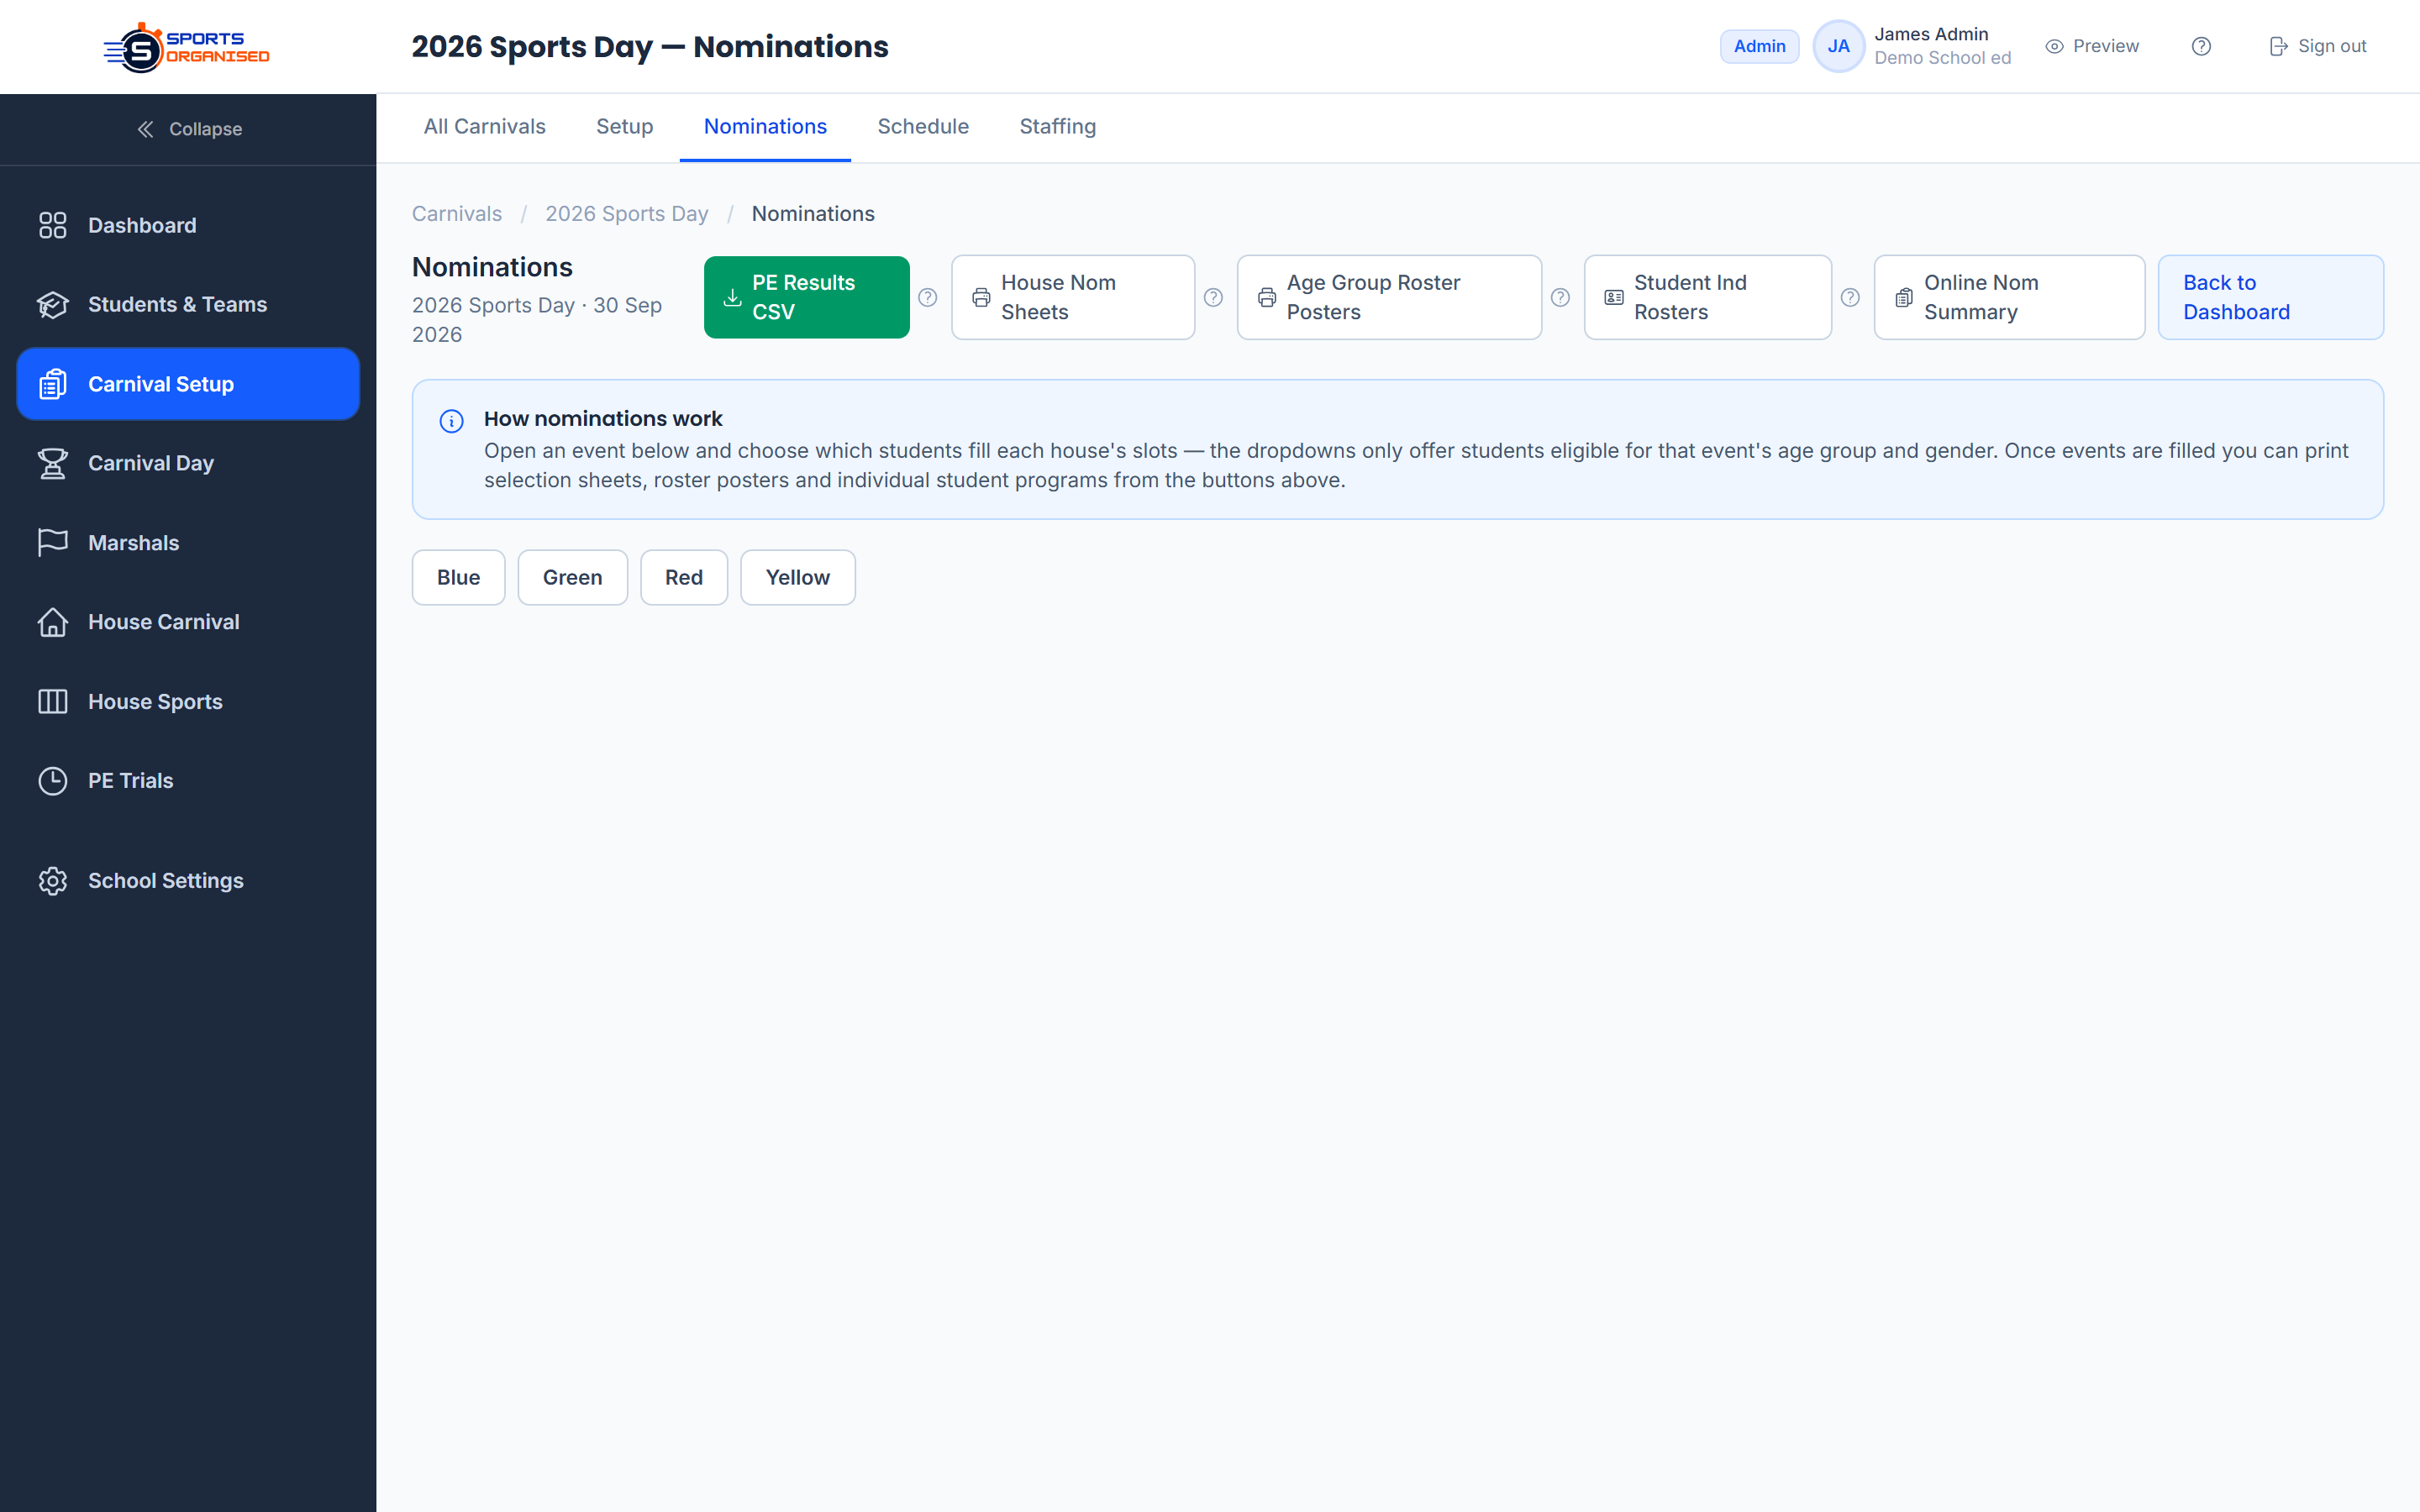
Screenshot: Nomination manager
Image will appear here once captured
Entering Results
Results are entered on carnival day by recorders. Each event shows the nominated athletes and lets you type results directly — times for track and swim events, distances or heights for field events. Places, points, and the house scoreboard all update automatically.
-
1
Open the results entry view
From the carnival page, click Results → Enter Results. Use the event list on the left to jump between events. The nominated athletes for the selected event are shown in a results table, ready for entry.
-
2
Enter the result for each athlete
For track and swim events, enter the time in minutes, seconds, and hundredths (e.g. 0:13.45). For field events, enter the distance in metres (e.g. 4.82) or height in centimetres for high jump. The platform sorts and assigns places in real time as you type — no manual ranking needed.
-
3
Mark DSQ or DNS where needed
Tick the DSQ checkbox to disqualify an athlete — they are excluded from placings and receive no points. A DNS (Did Not Start) is recorded by leaving the result blank and saving. Neither DSQ nor DNS athletes affect other athletes' places.
-
4
Performance standards zones
If your carnival has Bronze / Silver / Gold standards configured, each result row shows which zone the athlete's performance falls into. This gives immediate feedback during entry and is shown on printed score sheets.
-
5
Points are calculated automatically
Once saved, the scoring engine looks up each athlete's place in the carnival points table and adds the points to their house total. The live scoreboard refreshes automatically — no manual tallying required.
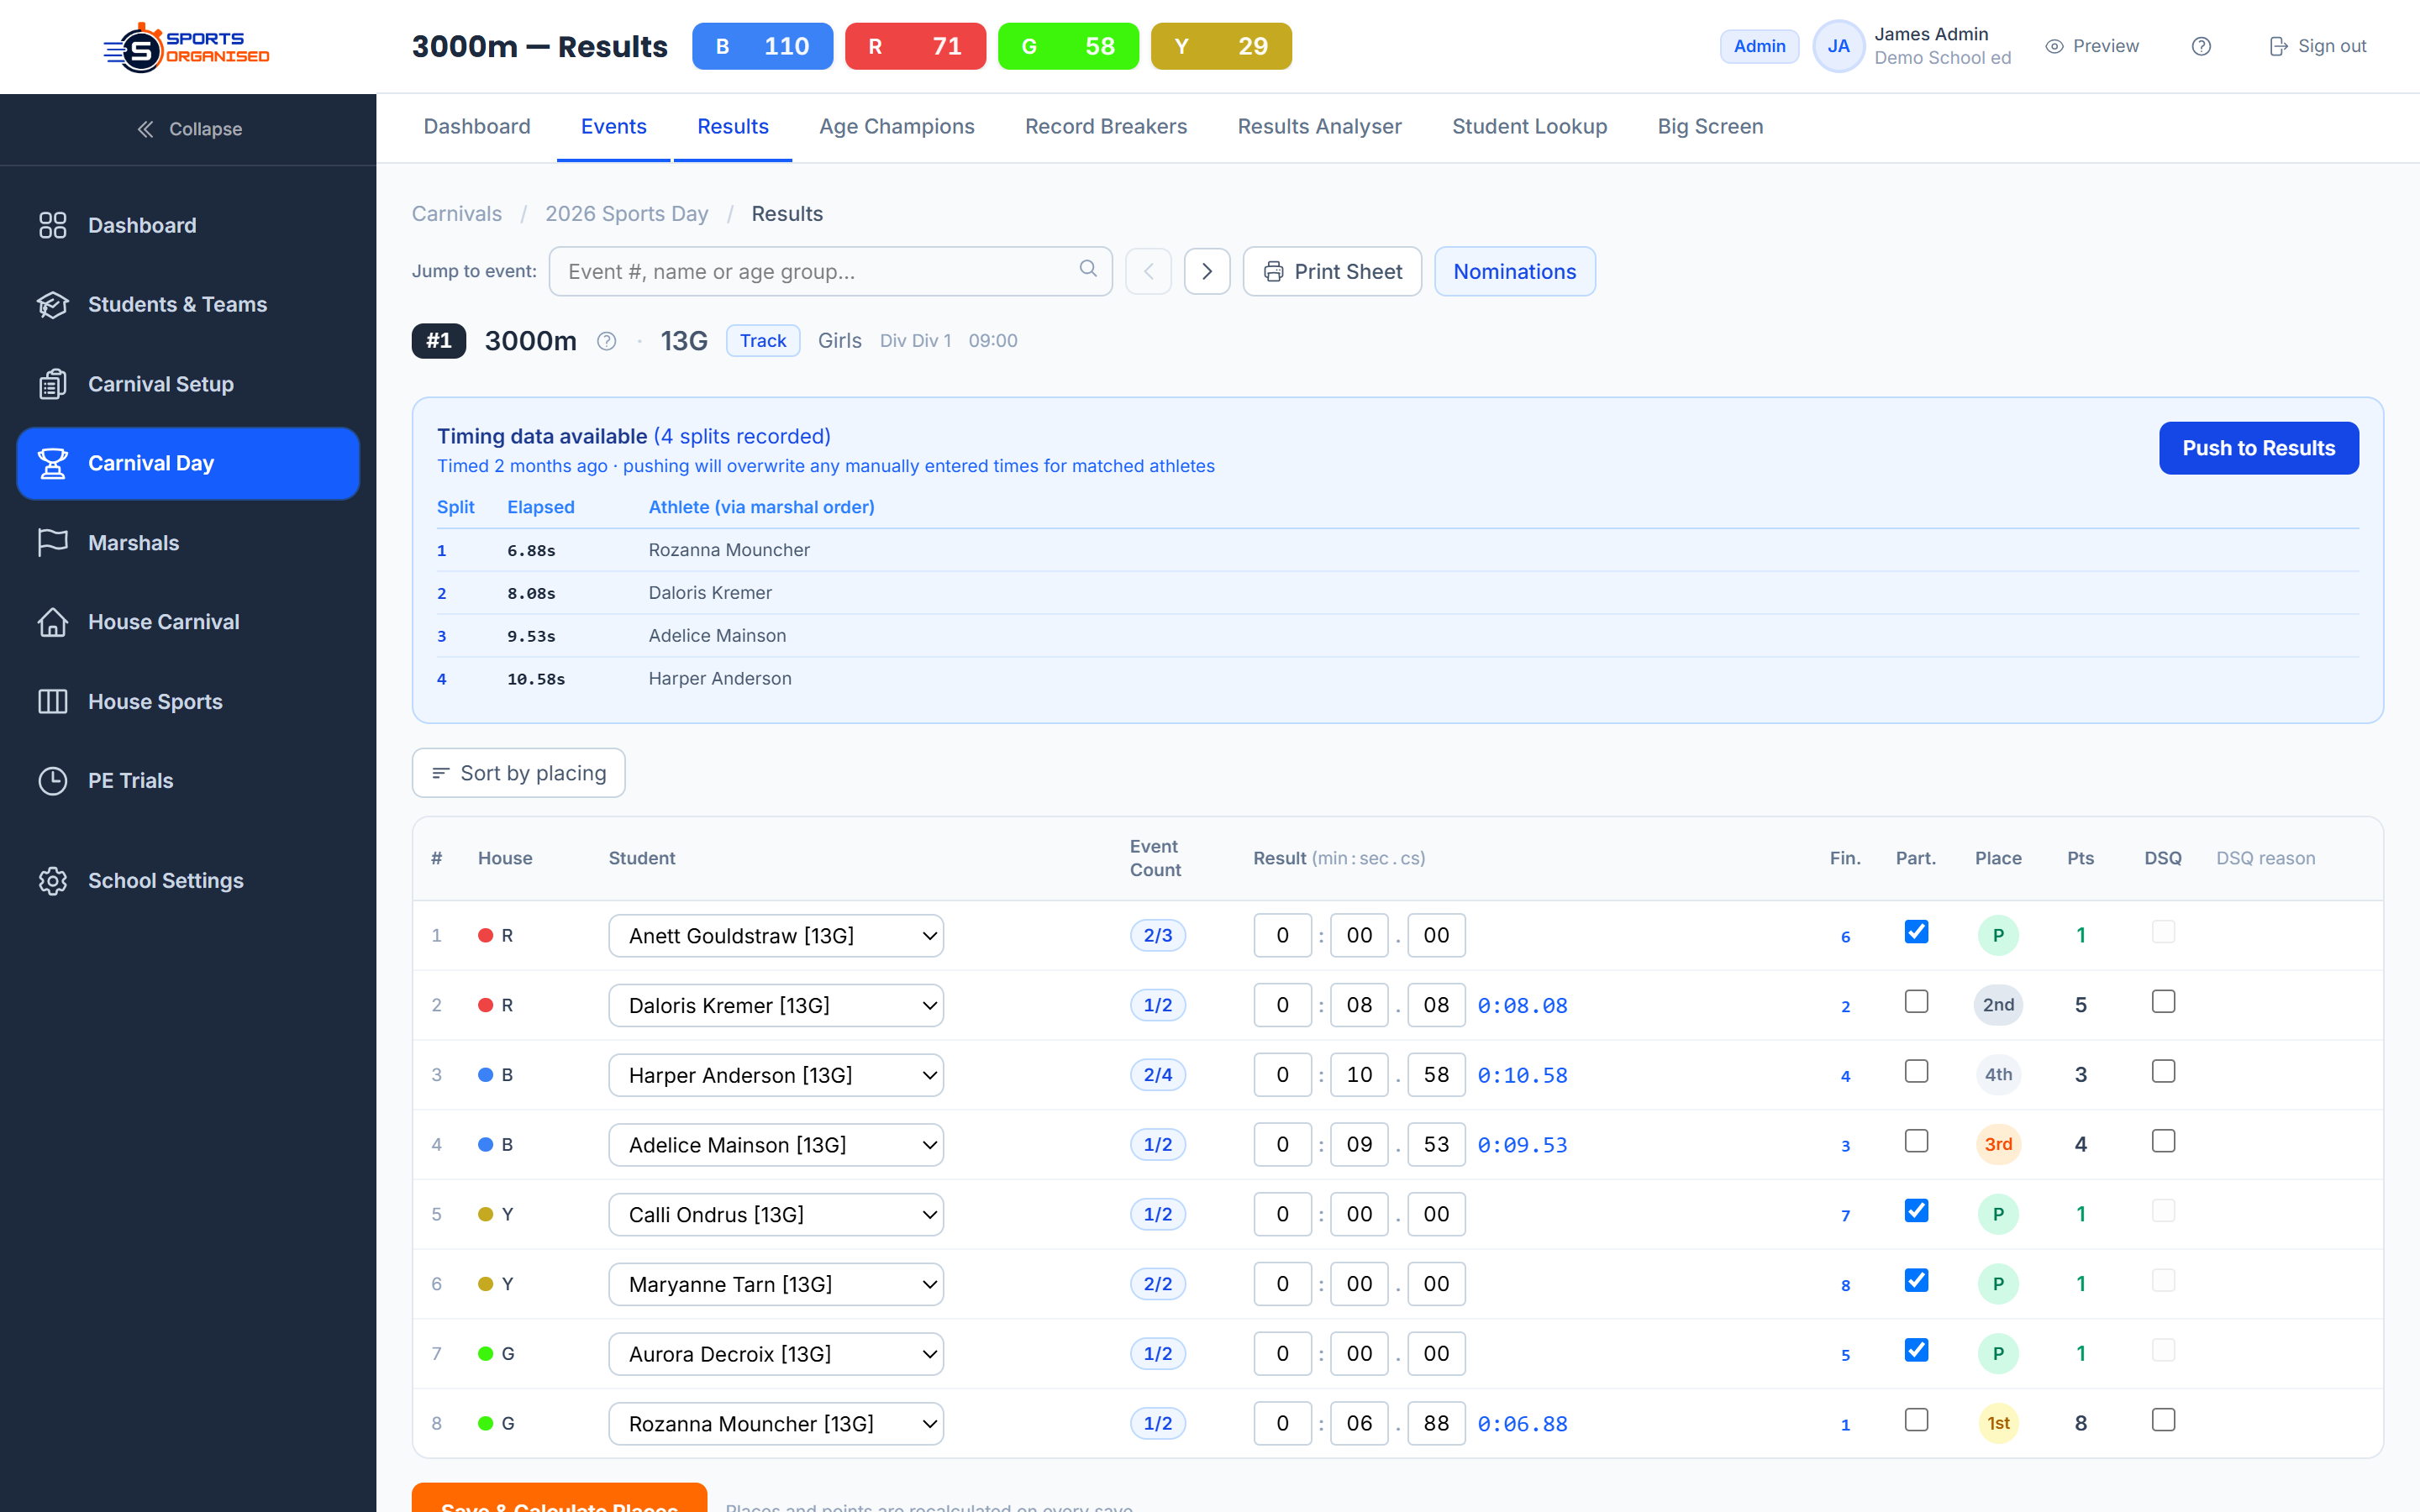
Screenshot: Results entry view
Image will appear here once captured
Score Sheets & Reports
Score sheets are printable A4 documents for each event — handed to recorders on the day to capture results on paper before they're entered into the system. Results can also be exported as a CSV for record-keeping.
-
1
Print individual score sheets
From the carnival page, go to Score Sheets. Select an event and click Print to open the print-ready A4 view. Each sheet lists the nominated athletes, blank result fields, and the school record (if set).
-
2
Batch print for the whole carnival
To print all score sheets at once, click Print All. The browser print dialog opens with all events collated in running order — one page per event. This is designed for preparing a complete set of sheets the morning of the carnival.
-
3
Export results as CSV
After results are entered, go to Results → Export to download a CSV of all results for the carnival. The export includes student names, events, places, times/distances, and points — suitable for importing into your school's student management system or for archival records.
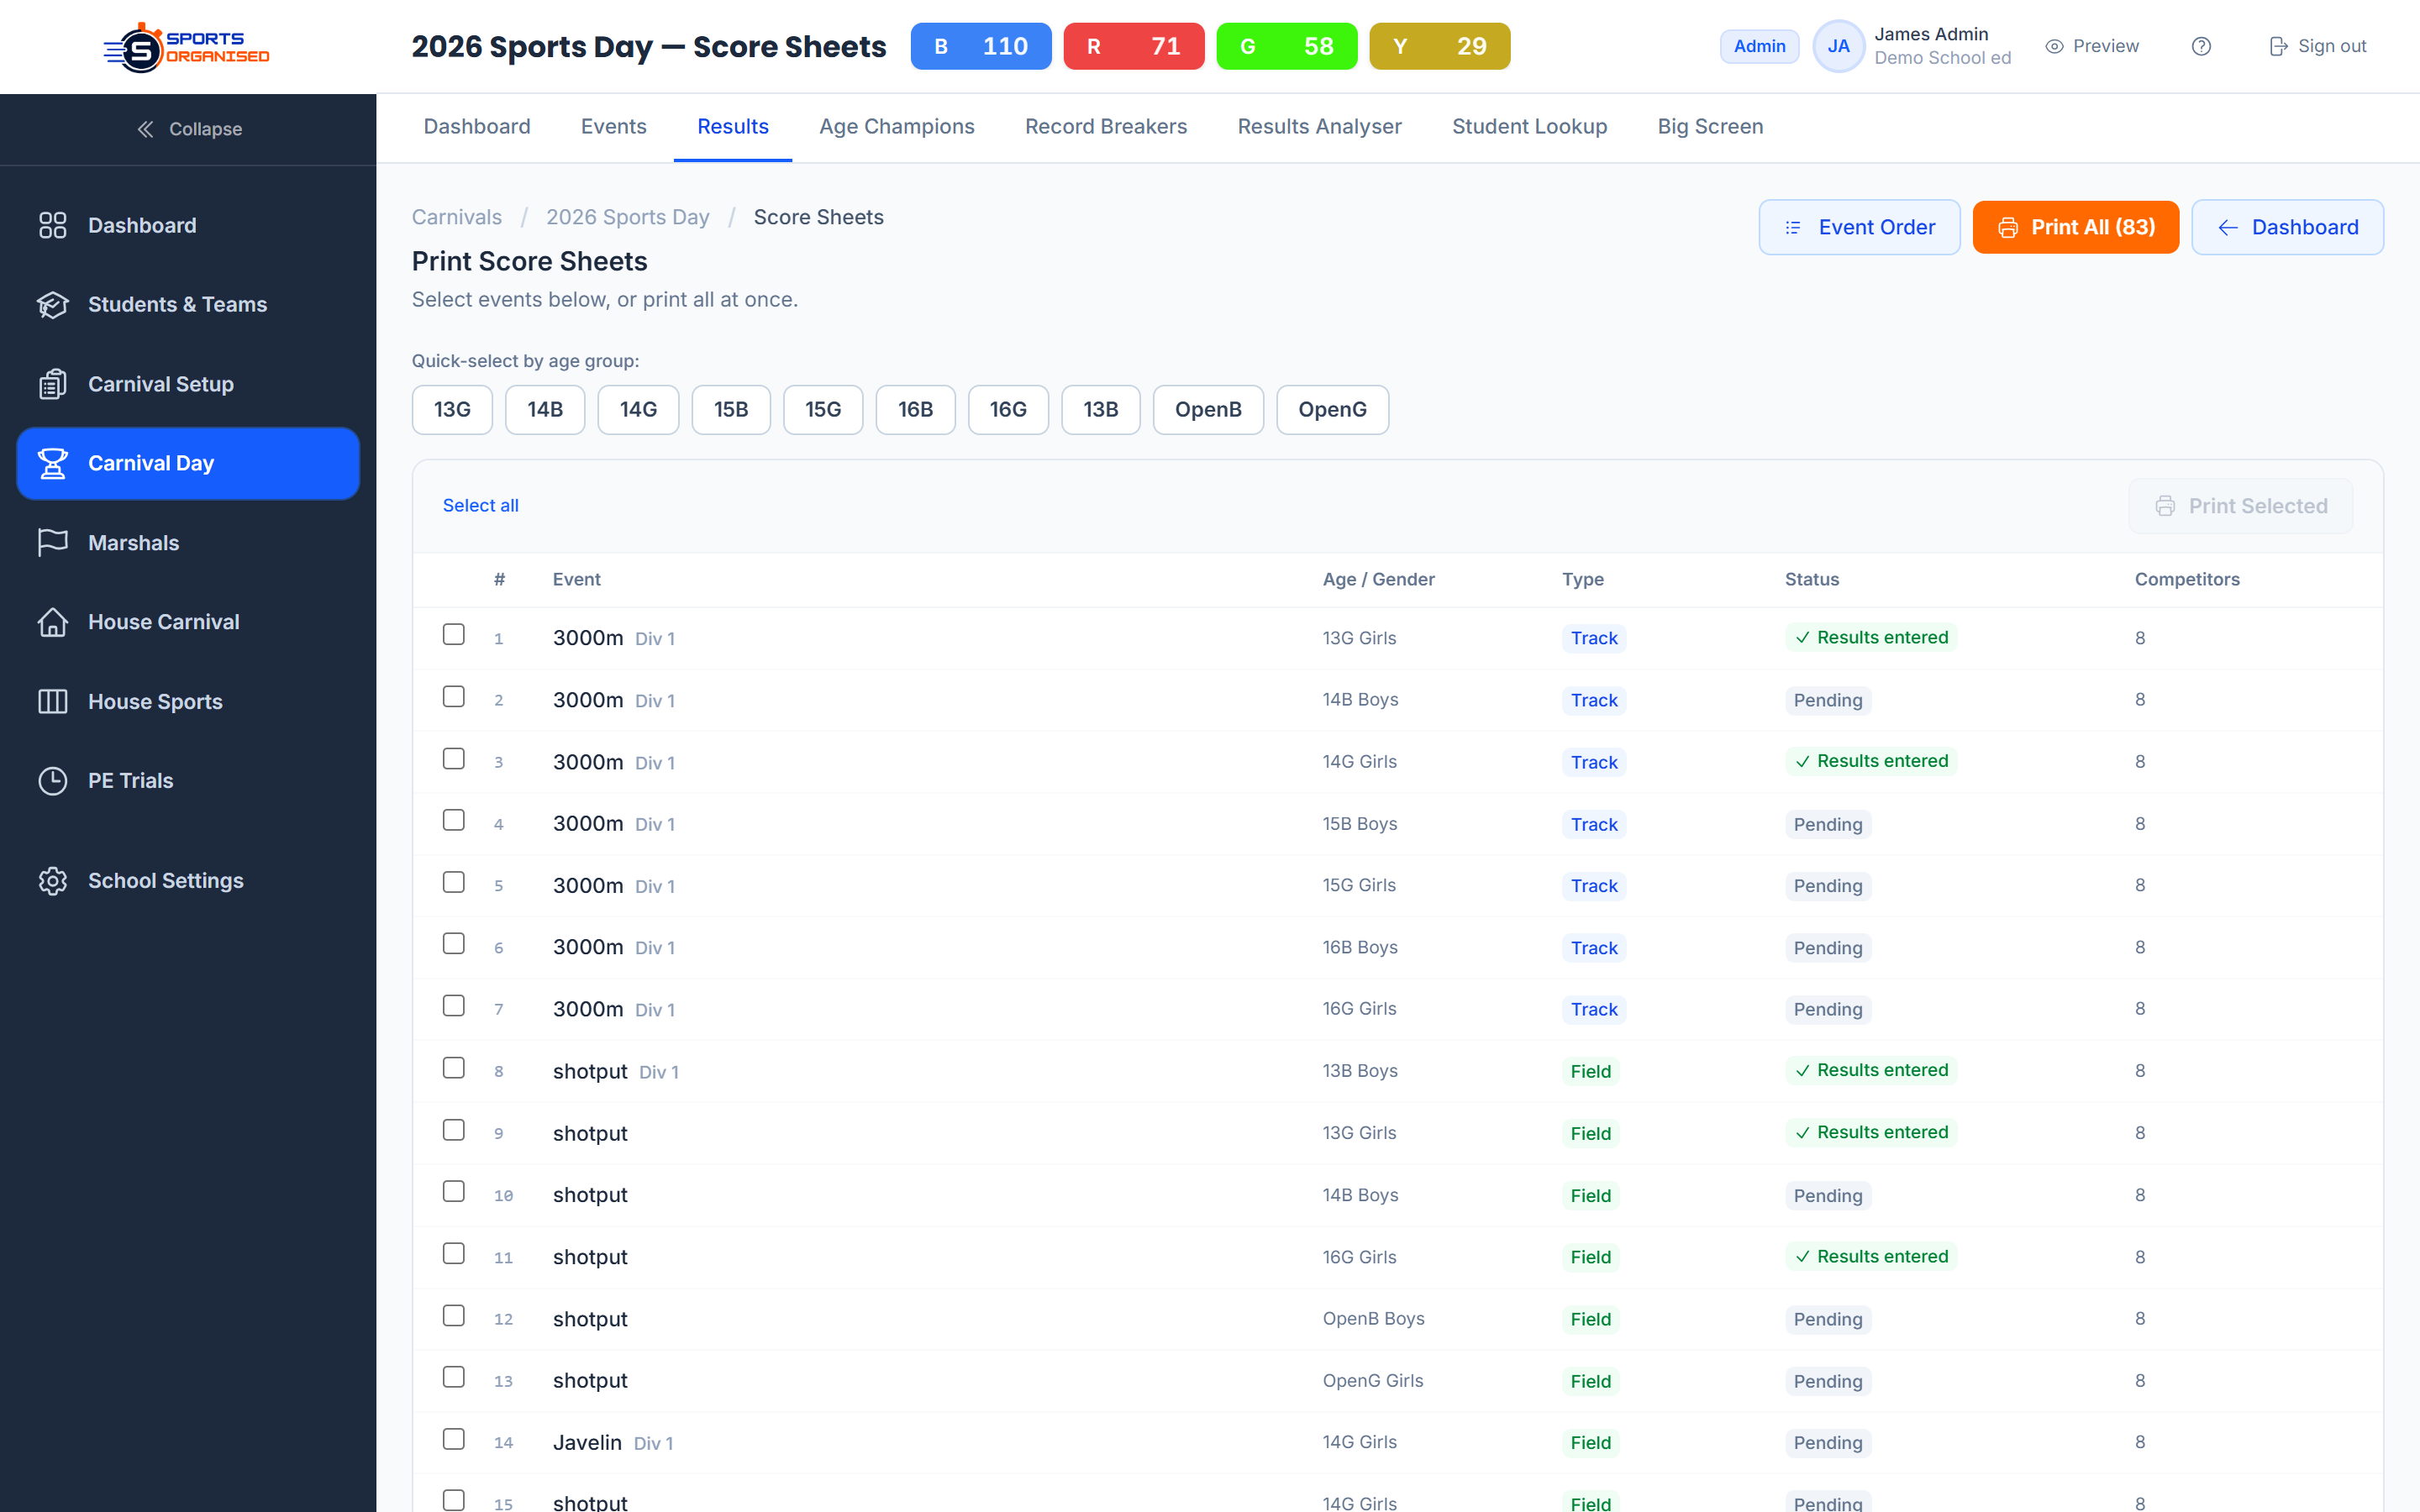
Screenshot: Score sheets & export
Image will appear here once captured
Schedule & Running Order
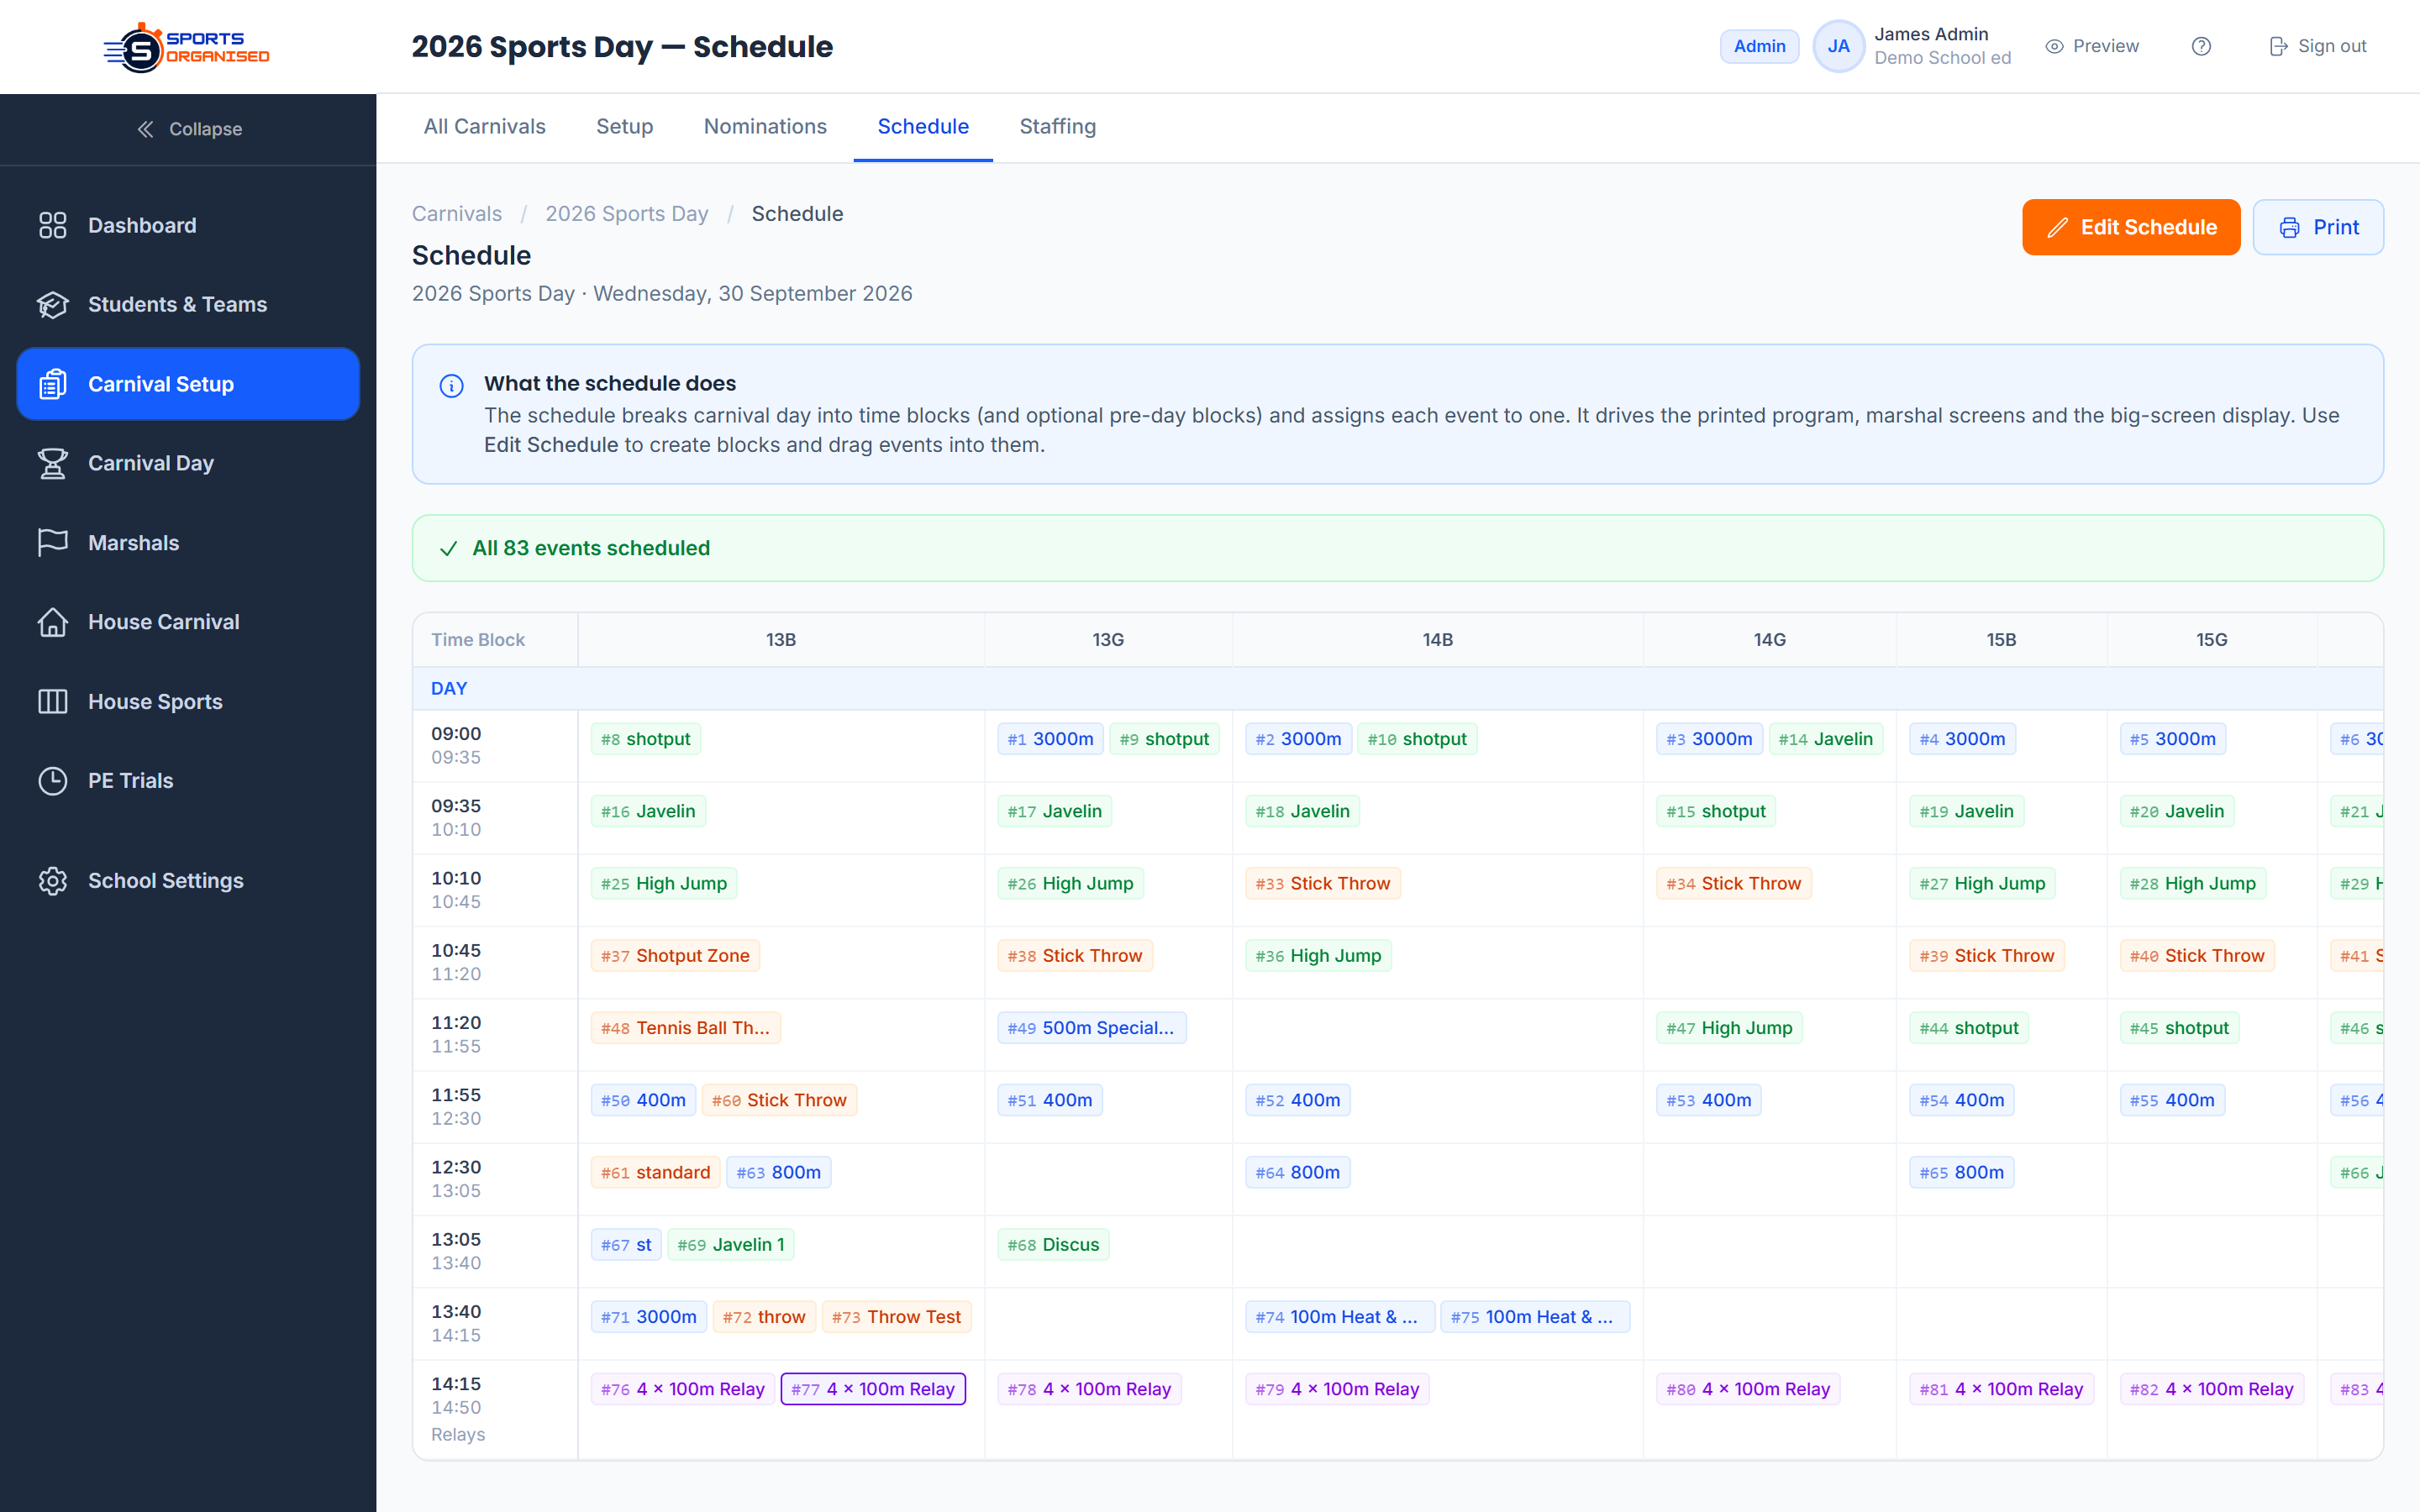
The schedule organises your carnival into timed blocks — for example, a pre-day briefing followed by the day's events in order. Once built, it drives printed programs, the marshal briefing, and the event order on the results entry screen.
-
1
Open the schedule editor
From the carnival hub, click Schedule → Edit Schedule. The schedule builder shows a timeline with two types of blocks: Pre-day (briefings, warm-ups) and Day (the carnival itself). Each block has a start time and end time.
-
2
Use Quick Setup for a standard day
Click Quick Setup to generate a standard schedule from your carnival start and finish times. This creates time blocks automatically and assigns events in event-number order. You can then adjust individual block times or reassign events as needed.
-
3
Assign events to time blocks
Each schedule block can hold one or more events. Drag and drop events into blocks, or use the assignment dropdowns. Events not yet assigned to a block will appear in the unscheduled list at the bottom.
-
4
Print the schedule
Go to Schedule → Print Schedule to open the print-ready view. This produces a clean A4 running sheet showing all events in timed order — suitable for distributing to marshals, recorders, and house managers the morning of the carnival.
Screenshot: Schedule builder
Image will appear here once captured
Staffing & Marshal Interfaces
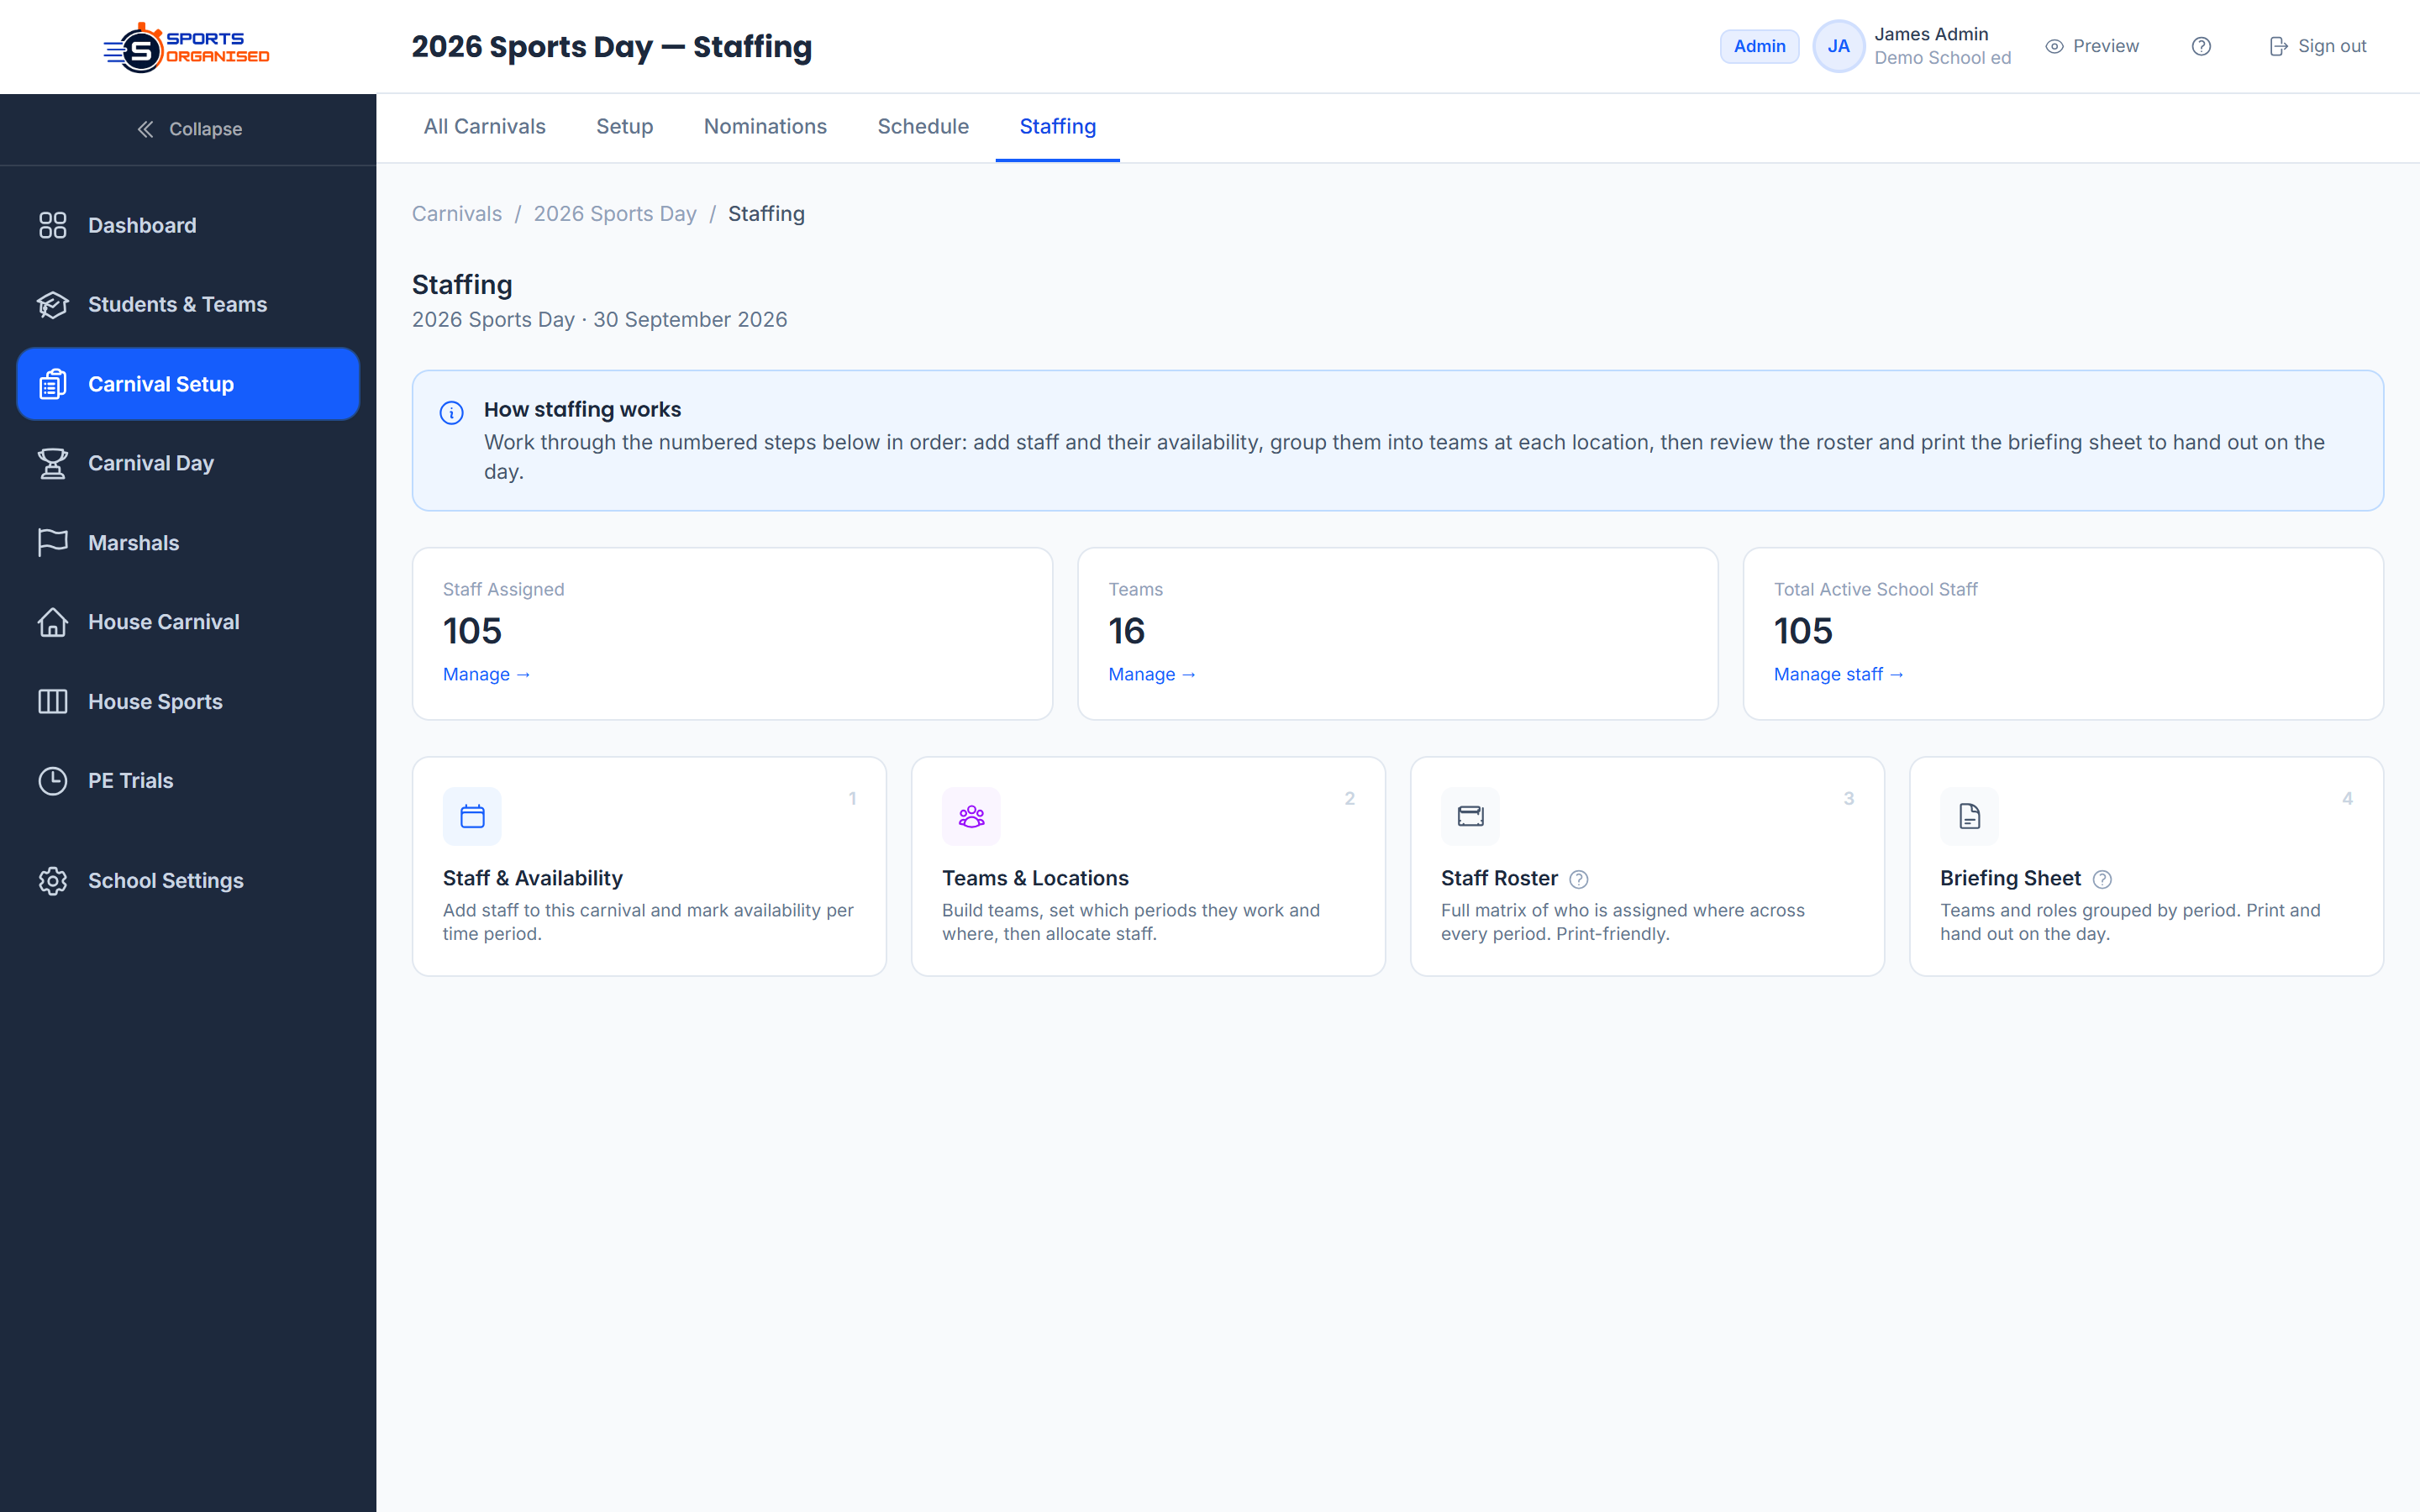
The staffing system helps you assign staff to roles for the carnival day. On the day itself, each marshal type has a dedicated interface optimised for their job — starters, finish line recorders, field event judges, and timing operators all get a tailored screen.
Setting up staffing
-
1
Create role templates
Go to School → Role Templates to define reusable staffing roles — for example, "Track Marshal", "Field Recorder", or "Starter". Each template can be linked to specific events or schedule modules. Templates are reused across carnivals, so you only build them once.
-
2
Collect staff availability
Under Carnival → Staffing → Availability, each staff member can indicate which parts of the day they are available. The system uses this when auto-suggesting staff for roles — unavailable staff are excluded from suggestions.
-
3
Assign staff to teams and slots
Use Staffing → Teams to group staff by location (e.g. "Long Jump Pit", "Track Finish"). Use Staffing → Roster to view the full assignment grid and fill any remaining gaps. The briefing view generates a printable summary for each staff member.
Marshal interfaces on the day
Starter Marshal
Shows upcoming events in order. Displays lane/bib assignments for the current heat. Optimised for quick scanning — large text, minimal controls.
Finish Marshal (Results Entry)
A streamlined results entry view for recorders at the finish line. Enter place or time per athlete and submit — the full results screen shows the complete event summary.
Field Event Sheet
Purpose-built for field events (long jump, shot put, discus, etc.). Enter up to three attempts per athlete. For high jump, a specialist interface handles progressive heights and pass/fail recording.
Track Timer
For schools using manual timing, the track timer interface lets a timekeeper log split times per lane. Times are recorded directly against the event and feed into the results system.
Screenshot: Staffing roster & marshal interfaces
Image will appear here once captured
Scoreboard & Public Display
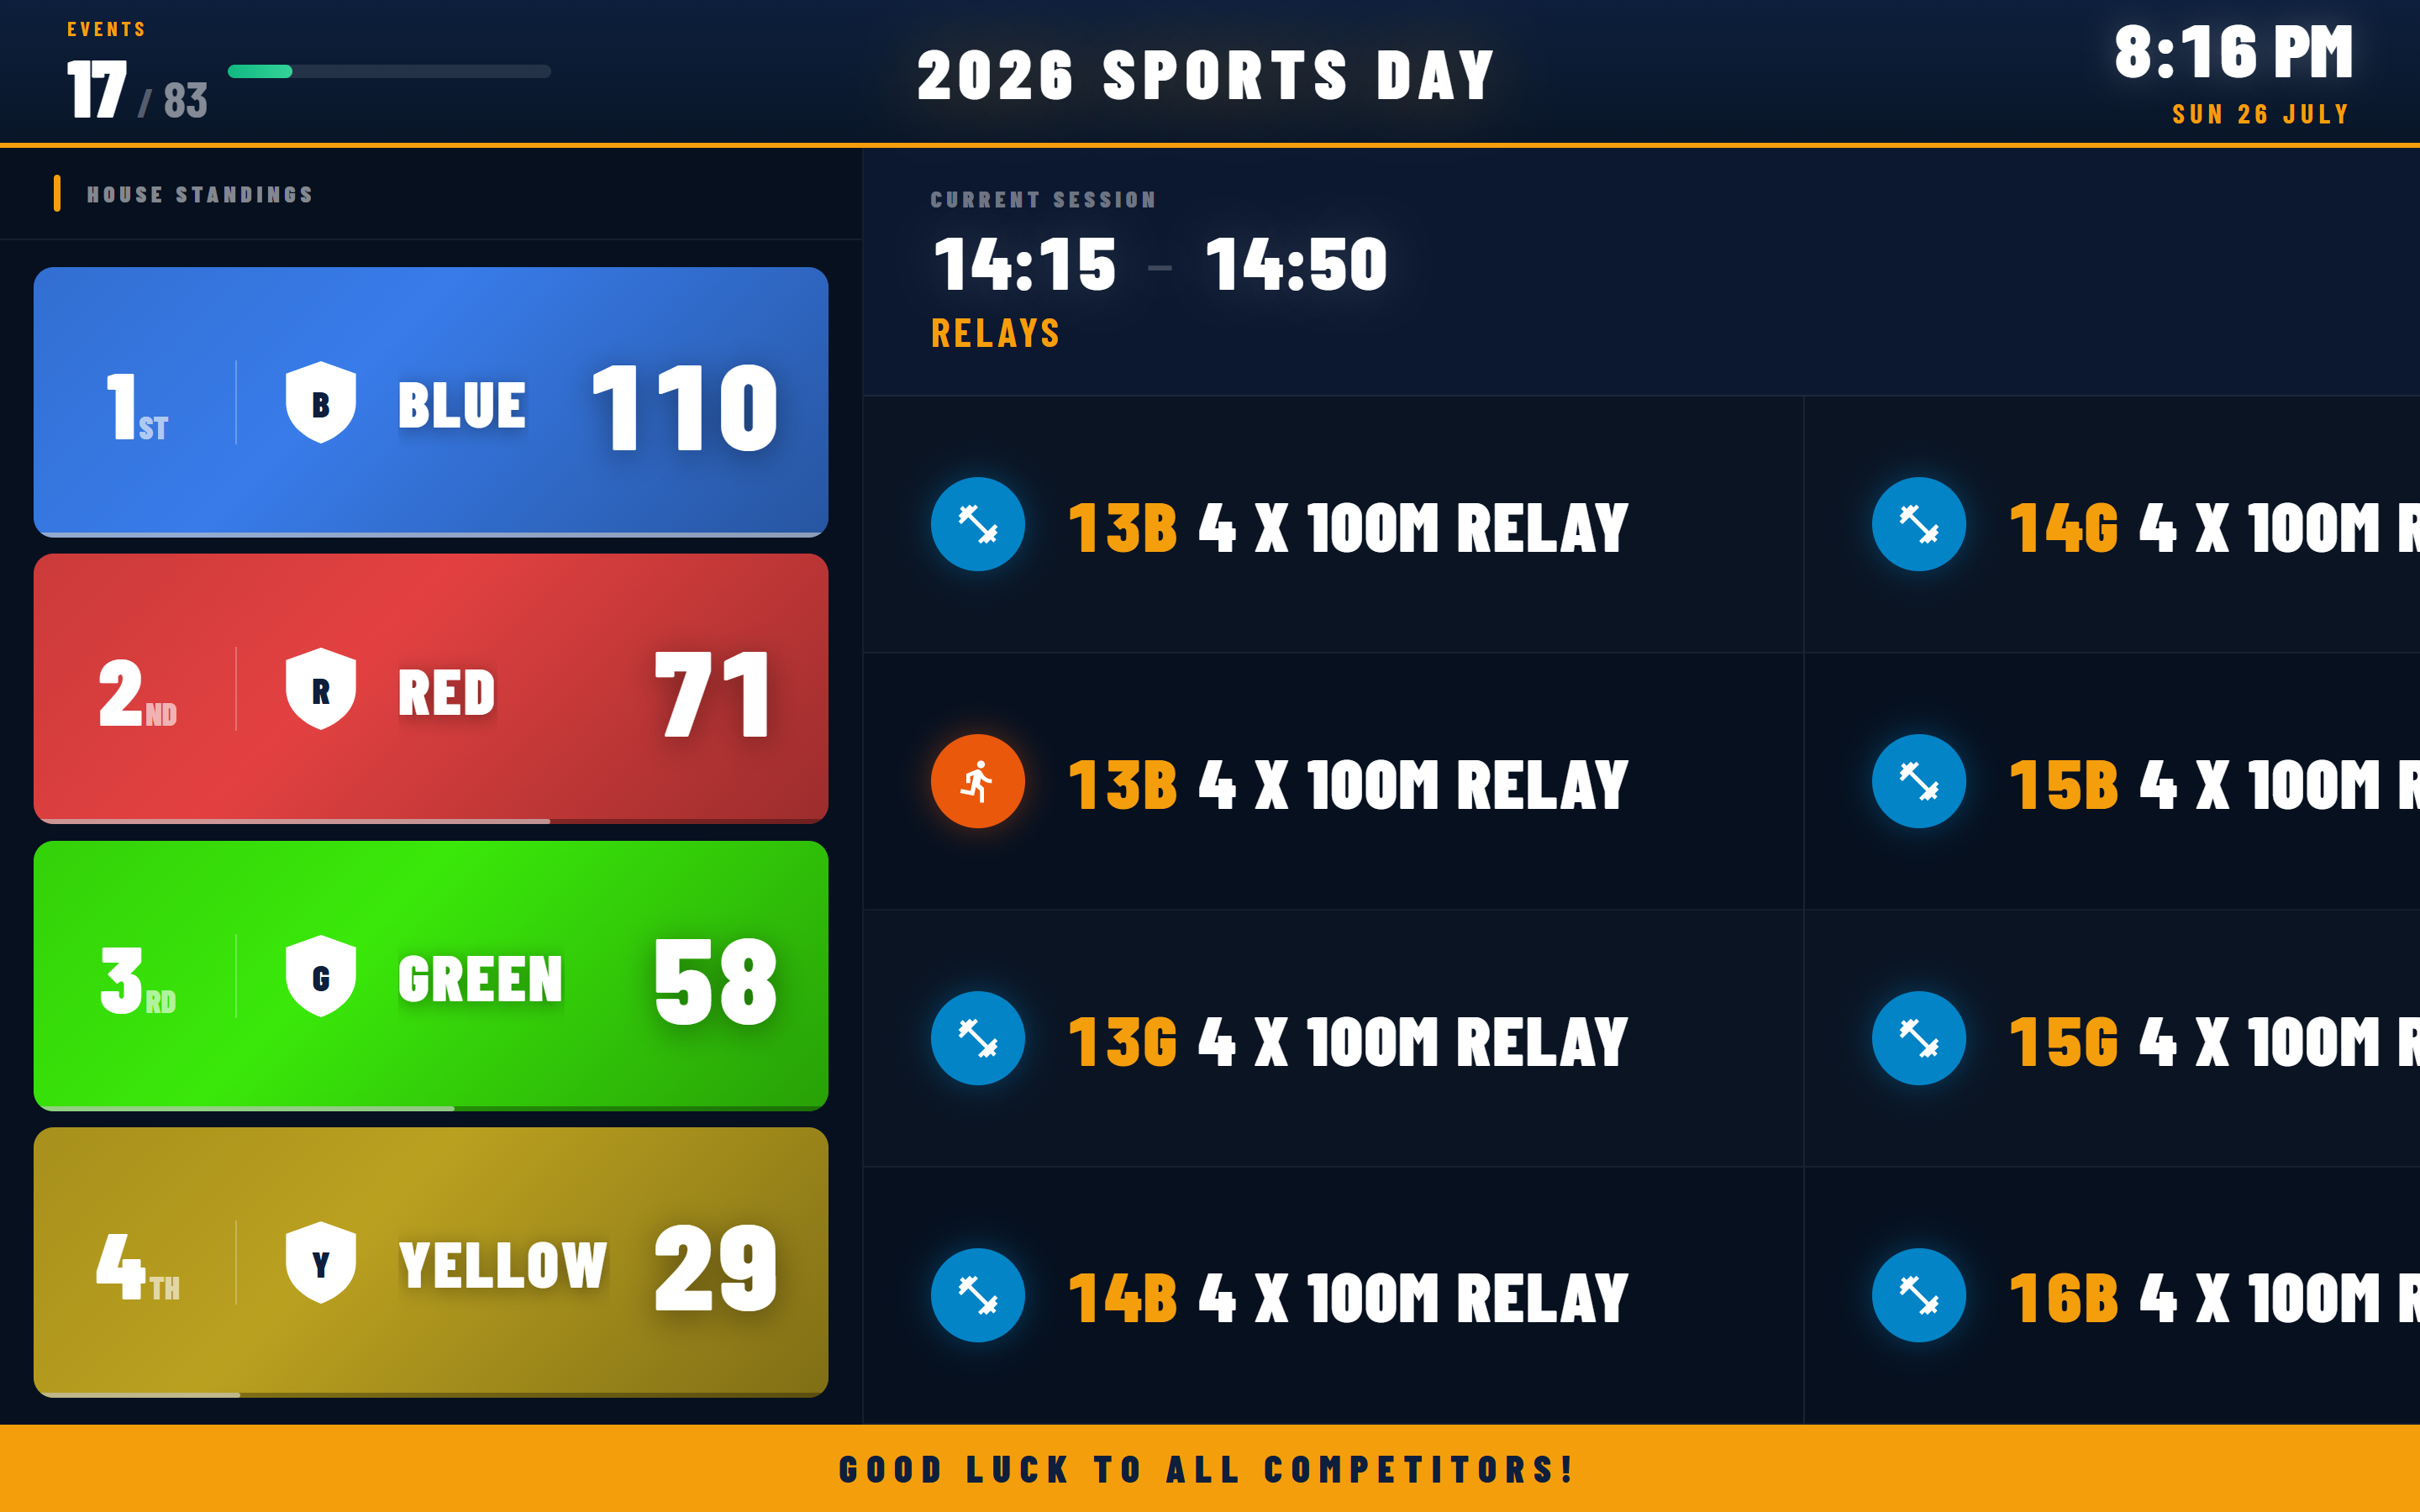
The scoreboard updates live as results are entered — no manual refreshing needed. You can display it on a projector or large screen for the crowd, and share a public results link so parents can follow along on their phones.
-
1
Open the live scoreboard
From the carnival page, click Scoreboard. The scoreboard shows each house's running points total, the number of completed events, and the current standings. It refreshes automatically every minute — no manual action required.
-
2
Display on a big screen
Go to Big Screen Display from the carnival page. This opens a full-screen, high-contrast view designed for projection. Connect a laptop to a projector or TV, open this view, and it will continuously update throughout the day as results come in.
-
3
Share public results with parents
Go to Carnival Settings and click Generate Public Results Link. This creates a shareable URL that anyone can open — no login required. Parents can follow the scoreboard and event results on their phones in real time. The link can be revoked at any time from the same settings page.
-
4
Enable student self-nomination (optional)
For events where students nominate themselves, go to Carnival Settings and generate a Self-Nomination Link. Share this link with students — they fill in a public form to submit their nomination without needing a school account. Submissions appear in the Self-Nominations Summary for admin review.
Screenshot: Live scoreboard & big screen display
Image will appear here once captured
Records & Champions
SportsOrganised tracks carnival records for each event and automatically flags when a result breaks a record. Age-level champions are determined based on points earned across nominated events.
Event Records
-
1
Set the current record on each event
When creating or editing an event, enter the existing record value, the record holder's name, and the year it was set. For track and swim events, the record is in seconds. For field events, it is in metres.
-
2
Records are flagged automatically during results entry
If a result beats the current record during entry, the results screen highlights it immediately. After the carnival, the Record Breakers view (under the carnival page) lists all records broken that day, including the athlete's name, new time or distance, and the event.
-
3
Update the record after the carnival
Go to Events → Records to manually update the record value, holder name, and year for any event. This carries forward to the next carnival automatically.
Age Level Champions
-
1
Configure champion settings per carnival
Under Carnival Settings → Champions, set the maximum number of events a student may enter for champion eligibility and choose whether champion points are tallied in an Open division or separately per age group. These settings also enforce the nomination cap during the nominations phase.
-
2
View the champions leaderboard
Go to Champions from the carnival page. The leaderboard ranks students by their total points from champion-eligible events, grouped by age level and gender. This is updated automatically as results are entered throughout the day.

Screenshot: Record breakers & champions leaderboard
Image will appear here once captured
PE Trial System
The PE Trial System is included on every plan. Contact us if you don't see it in your account.
The PE Trial System lets your PE department run structured selection trials before the carnival. Students are tested in classes across multiple sessions, and their results are used to identify the strongest performers for carnival nomination.
-
1
Create PE Classes
Go to PE → Classes and click New Class. Enter the class name and year levels it covers. Use Bulk Create to generate multiple classes at once (e.g. one per year level). Add teacher accounts to each class so teachers can see and enter results for their own class only.
-
2
Set up PE Events
Go to PE → Events to define the trial events — for example, 800m, Long Jump, Shot Put. These are the disciplines students will be tested in. PE Events are shared across all classes and sessions.
-
3
Create trial sessions
Under each PE Class, create one or more sessions (e.g. "Week 3 Tuesday Trials"). You can optionally link a session to an upcoming carnival so results feed directly into the nomination selection process.
-
4
Enter results in the spreadsheet view
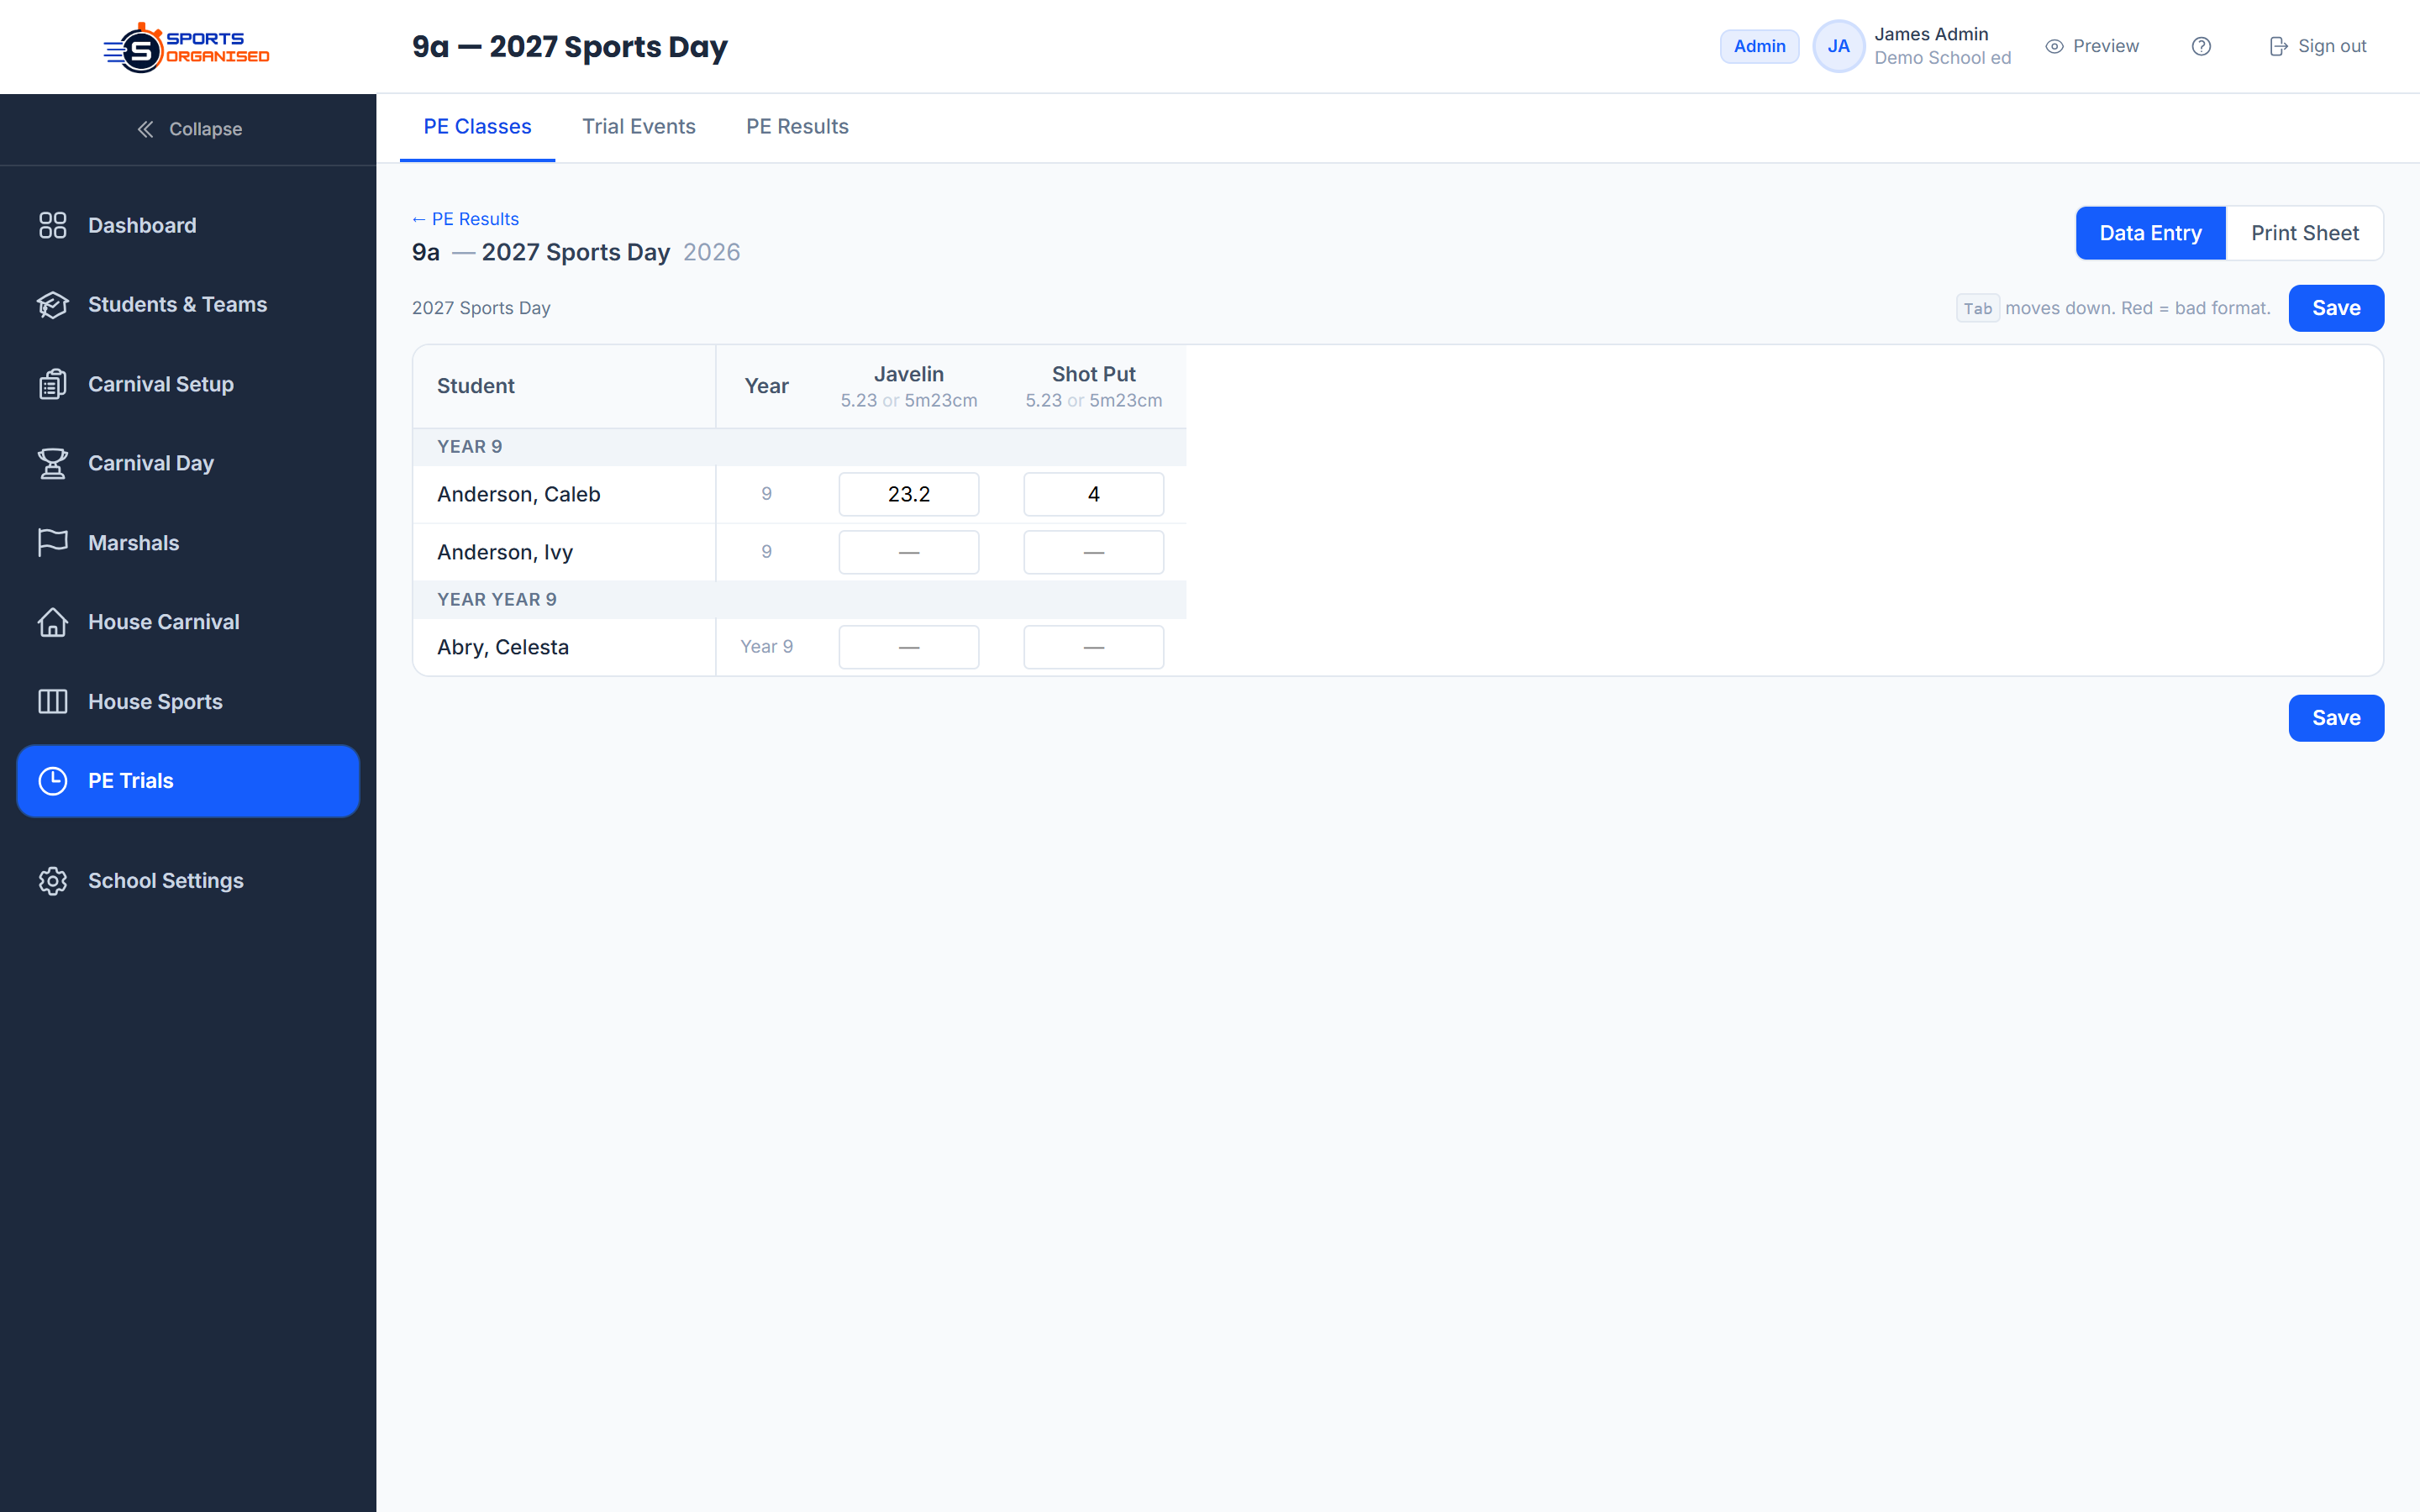
Open a session and click Enter Results. The results sheet shows all students in the class as rows and all PE events as columns — just like a spreadsheet. Tab between cells to move quickly. Results save automatically as you type, so there is no submit button to click.
-
5
Export trial results
Once trials are complete, go to PE → Results and click Export to download a CSV of all student results across all sessions and events. This is useful for PE coordinators who want to rank students in a spreadsheet before finalising carnival nominations.
Screenshot: PE trial results sheet
Image will appear here once captured
House Sports Competition
Run ongoing inter-house sport competitions — rugby, netball, soccer, and any other team sport — within the platform. The system generates fixtures automatically, tracks match results, and maintains a live ladder throughout the season.
-
1
Create a competition
Go to House Sports → Competitions and click New Competition. Enter the sport name and season (e.g. "Rugby League — Term 2 2025"). You can run multiple competitions simultaneously — one per sport.
-
2
Add divisions and enrol houses
Inside a competition, create one or more divisions (e.g. Senior, Junior). Then enrol the houses that will compete in each division. Only enrolled houses will appear in fixtures and on the ladder.
-
3
Generate the fixture draw
Open a division and click Generate Fixtures. The system uses a round-robin algorithm to create a balanced draw where every house plays each other. Fixtures are created as individual matches with dates and venues. After the regular season, click Generate Finals to create semi-finals and a grand final bracket.
-
4
Enter match results
Open any fixture and click Enter Result. Type in the score for each house. If a team forfeits, tick the forfeit checkbox instead of entering scores. The ladder updates automatically after each result is saved.
-
5
View the standings
The division page shows the current ladder with wins, losses, draws, points for/against, and ladder points. The schedule view shows all upcoming and completed fixtures in calendar order.
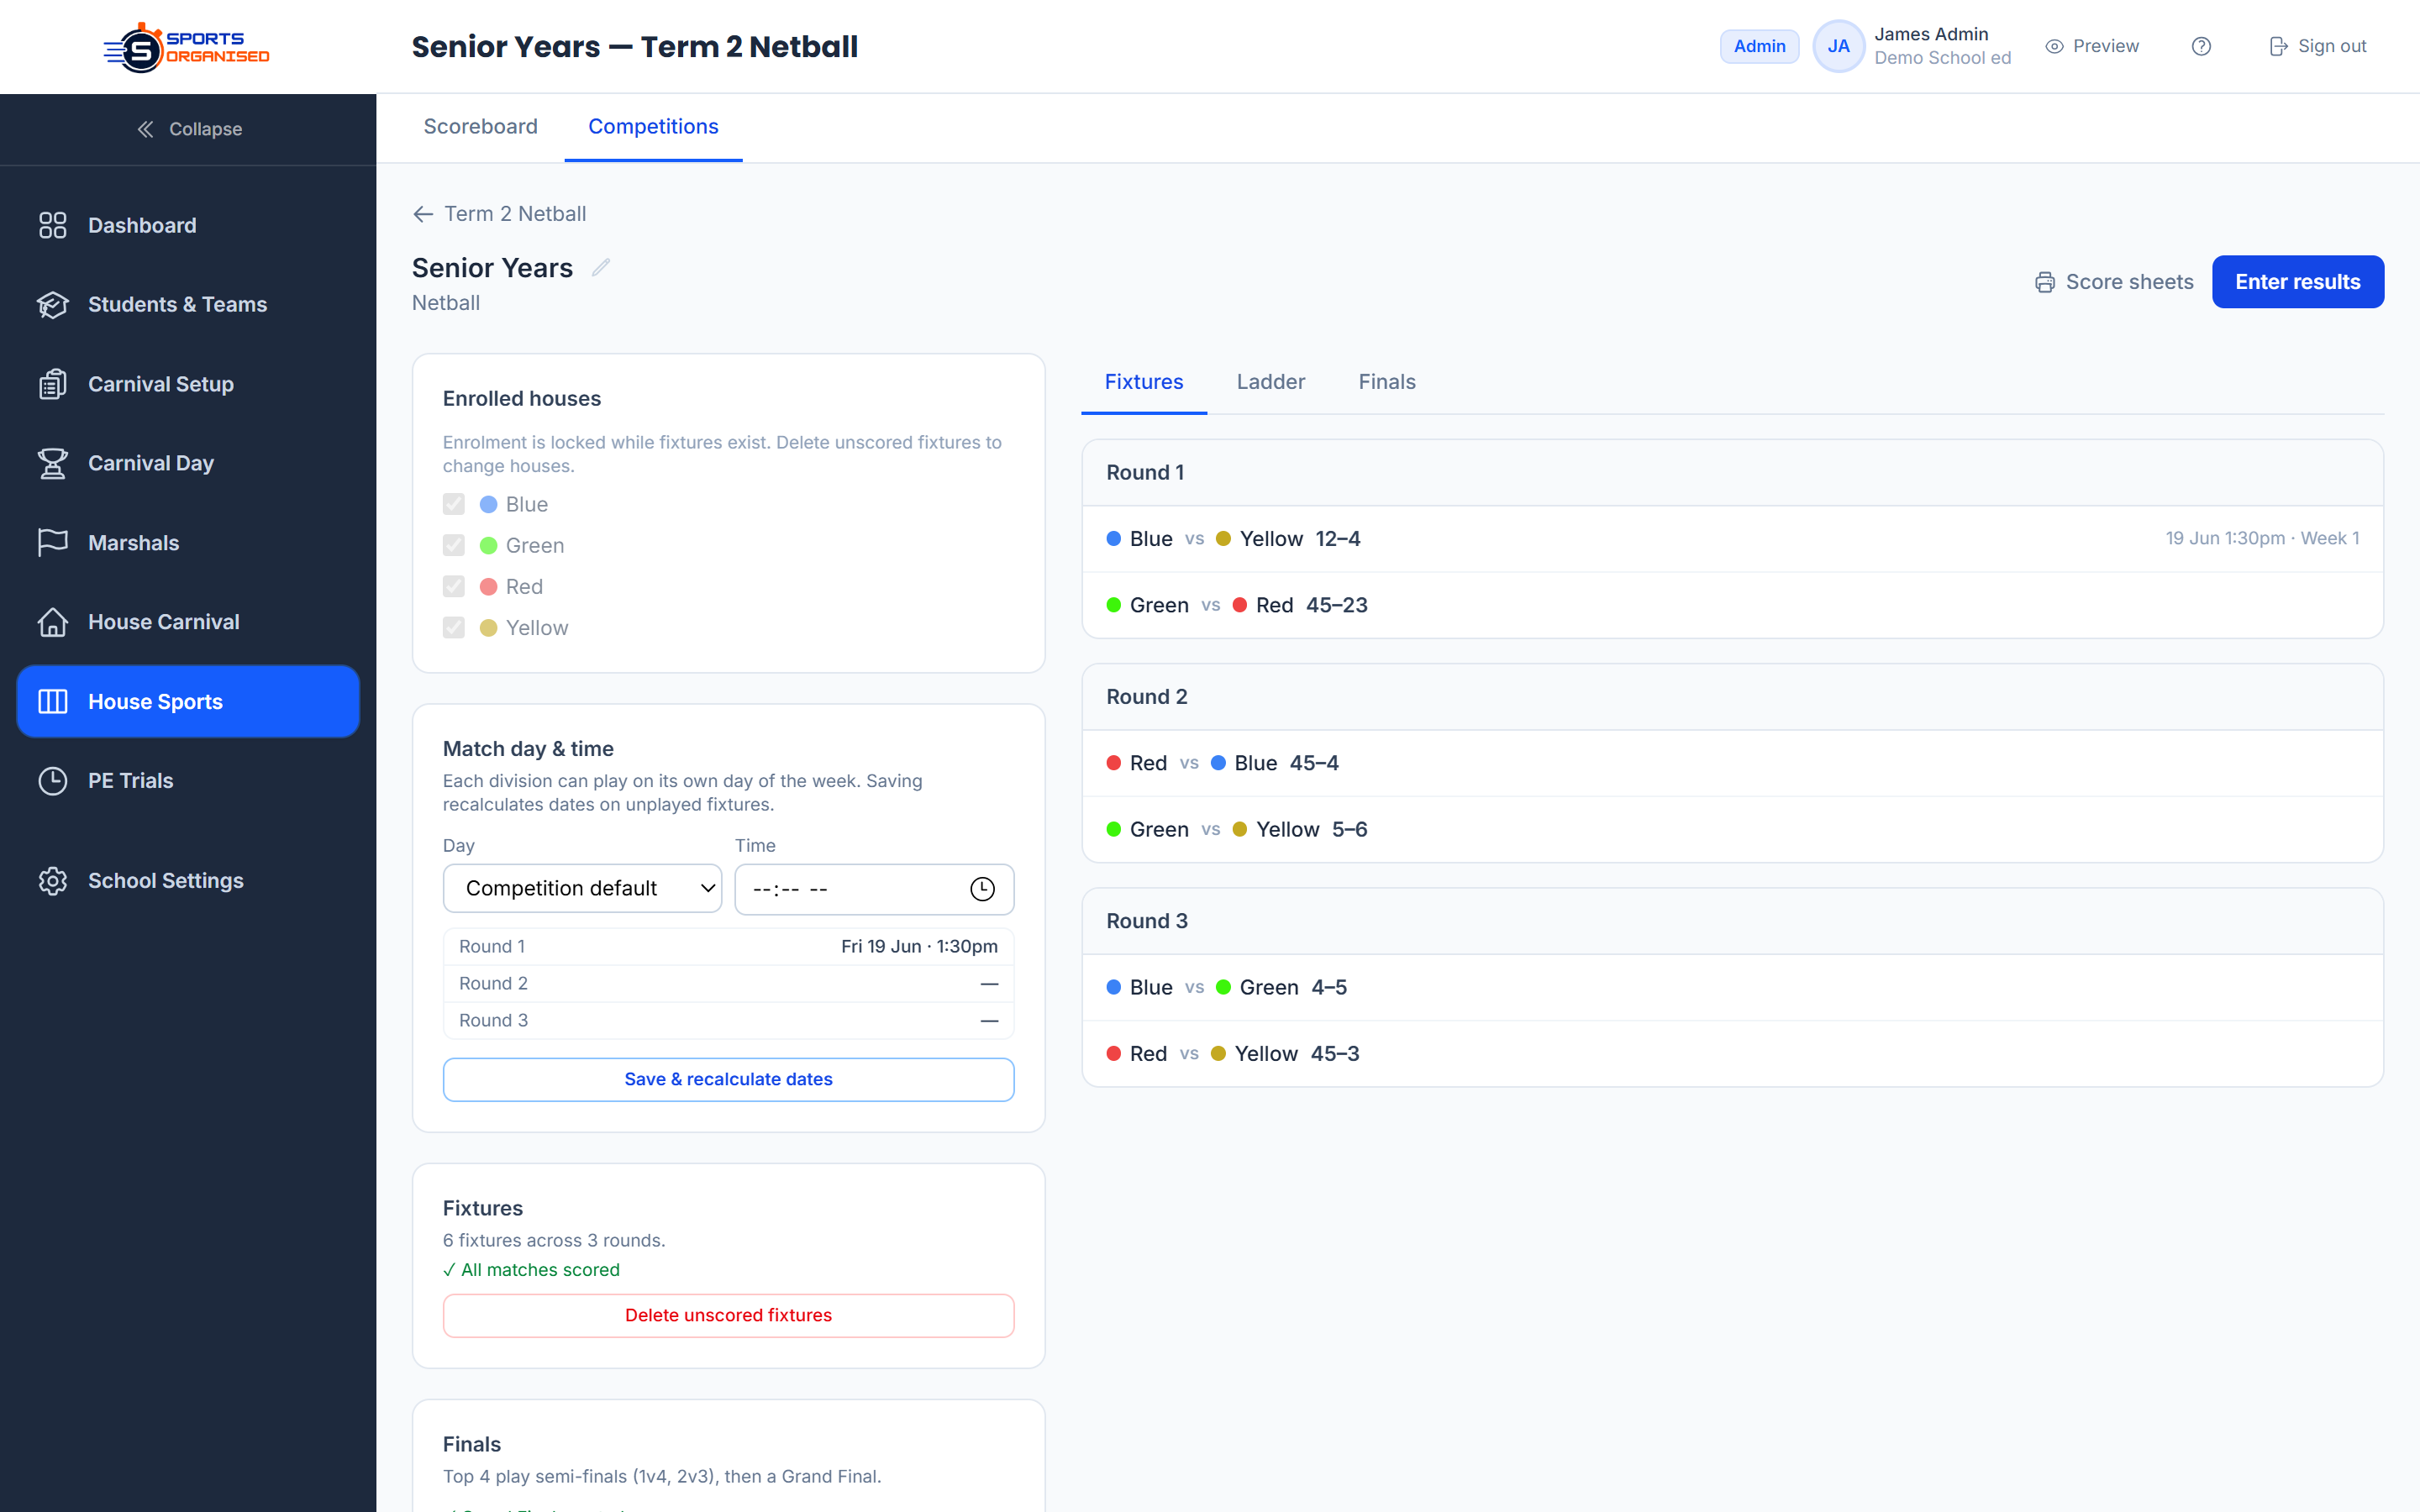
Screenshot: House sports fixture draw & ladder
Image will appear here once captured
User Roles & Access
Every staff member who uses SportsOrganised is assigned a role. Roles control which parts of the platform they can see and what actions they can take. Assign the minimum role needed — most staff only need carnival-day access.
Full access to the entire school account
Nominations for their own house only
Results entry on carnival day
View-only access plus marshal interfaces
Two-factor authentication (2FA)
Admins can enforce two-factor authentication for their account via Account → Security. Once enrolled, a 6-digit code from an authenticator app (Google Authenticator, Microsoft Authenticator, etc.) is required at each login. Admin accounts can reset another user's 2FA from School → Users if they lose access to their authenticator.
Microsoft 365 / Azure single sign-on
Every plan can enable Microsoft 365 sign-in. Once configured, all staff sign in with their school Microsoft account — no separate SportsOrganised password is required. Contact us to set this up. Once SSO is active, password-based login is disabled for your school.